Access Single Resource via Cloudflare Tunnels
Accessing an Resource deployed on Coolify using a Cloudflare Tunnel allows you to securely reach your app without exposing your server’s IP address or without having a Public IP address for the server.
Who this is for?
This setup is ideal for people who:
- Don't have a public IP for their server (could be a laptop, raspberry pi etc..).
- Are unable to port forward (e.g., using home internet or on a private network).
- Want to keep their server’s IP address private and avoid exposing it to the public internet.
- Have an app already deployed on Coolify and need an external method to access it securely.
Setup Requirements
To follow this guide, you'll need:
- A free Cloudflare account.
- You need a domain that has it's DNS managed by Cloudflare.
- Your Resource has to be deployed and managed with Coolify.
Before We Start
- We assume you have Coolify running and an app already deployed.
- If your app requires HTTPS for functionality like cookies or login, then you need to follow the Full TLS HTTPS guide after following this guide. This is because in this guide, Cloudflare will manage HTTPS externally, while your app will run over HTTP within Coolify.
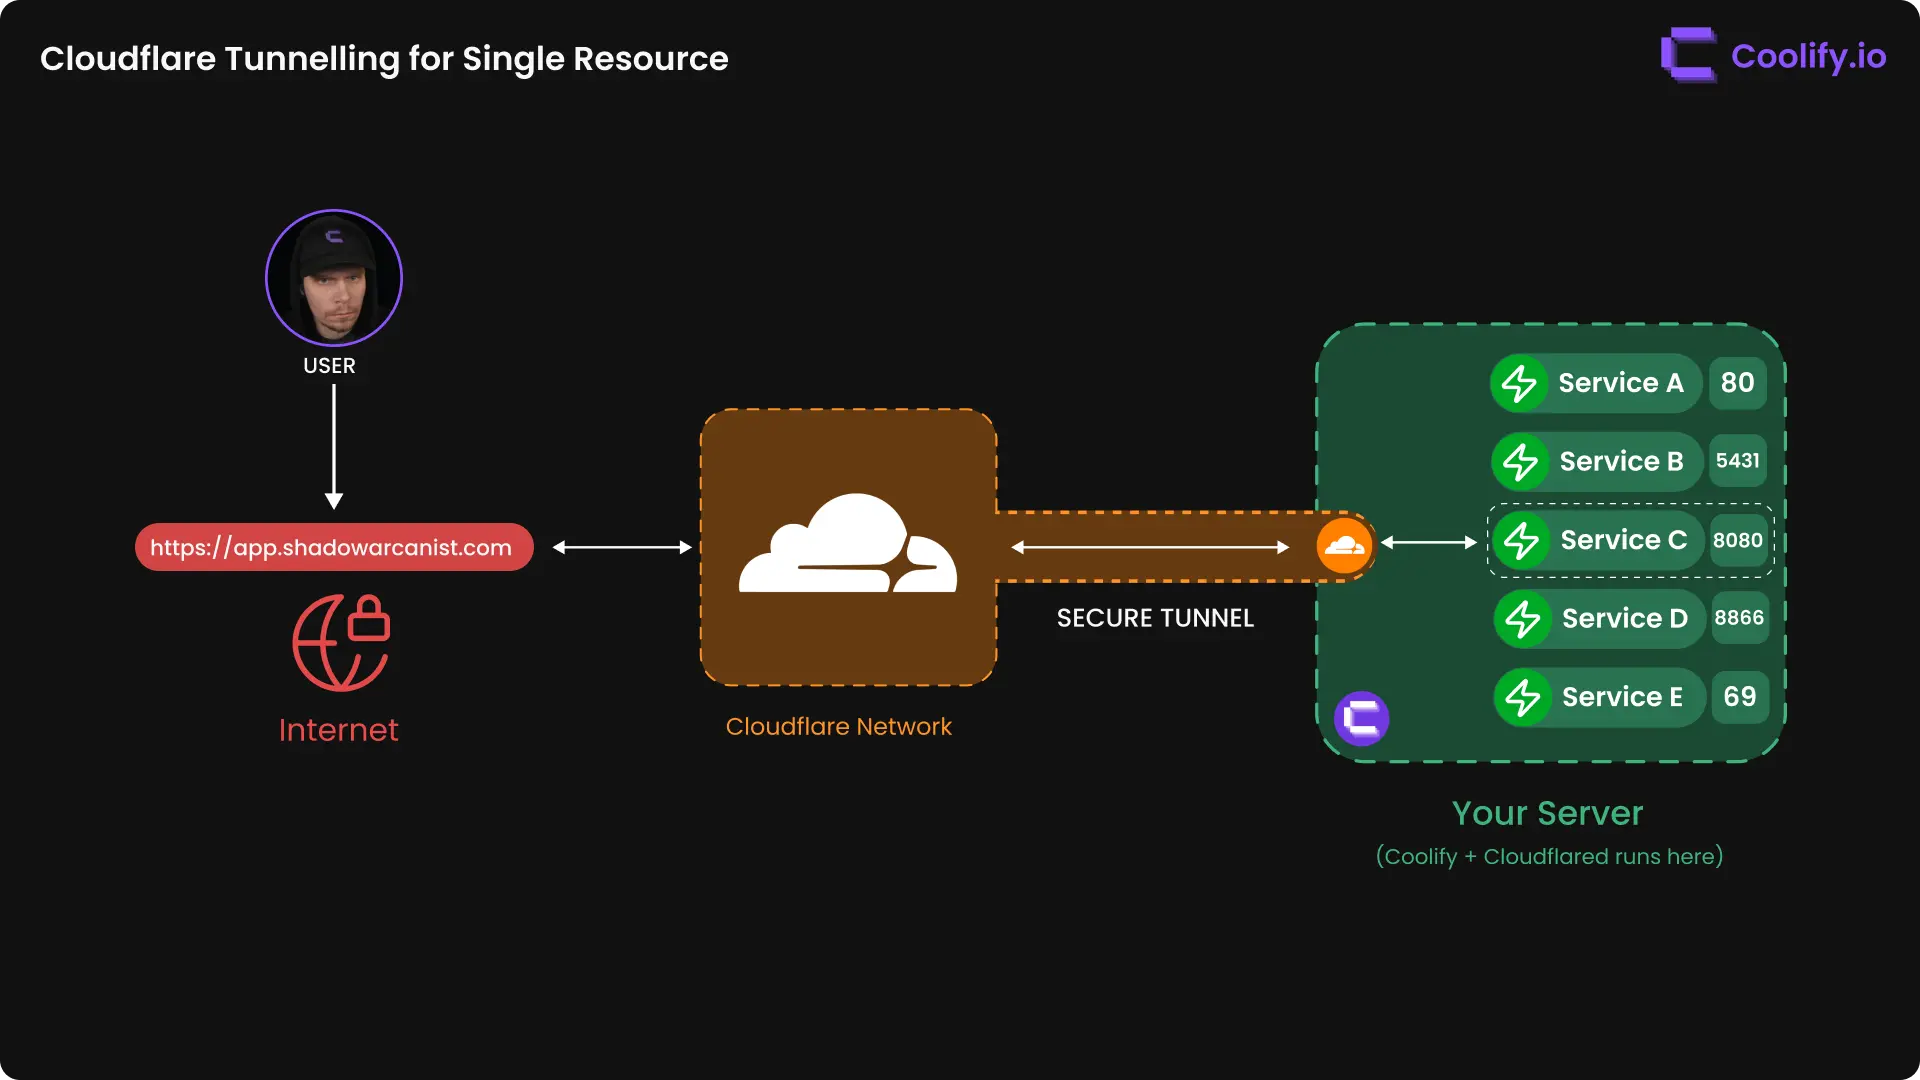
How It Works?
A simple high-level overview diagram to give you a visual idea of how this works:
Example Data
The following data is used as an example in this guide. Please replace it with your actual data when following the steps:
- Domain Name: shadowarcanist.com
- Ports Exposes: 80
- Ports Mapping: 4477:80
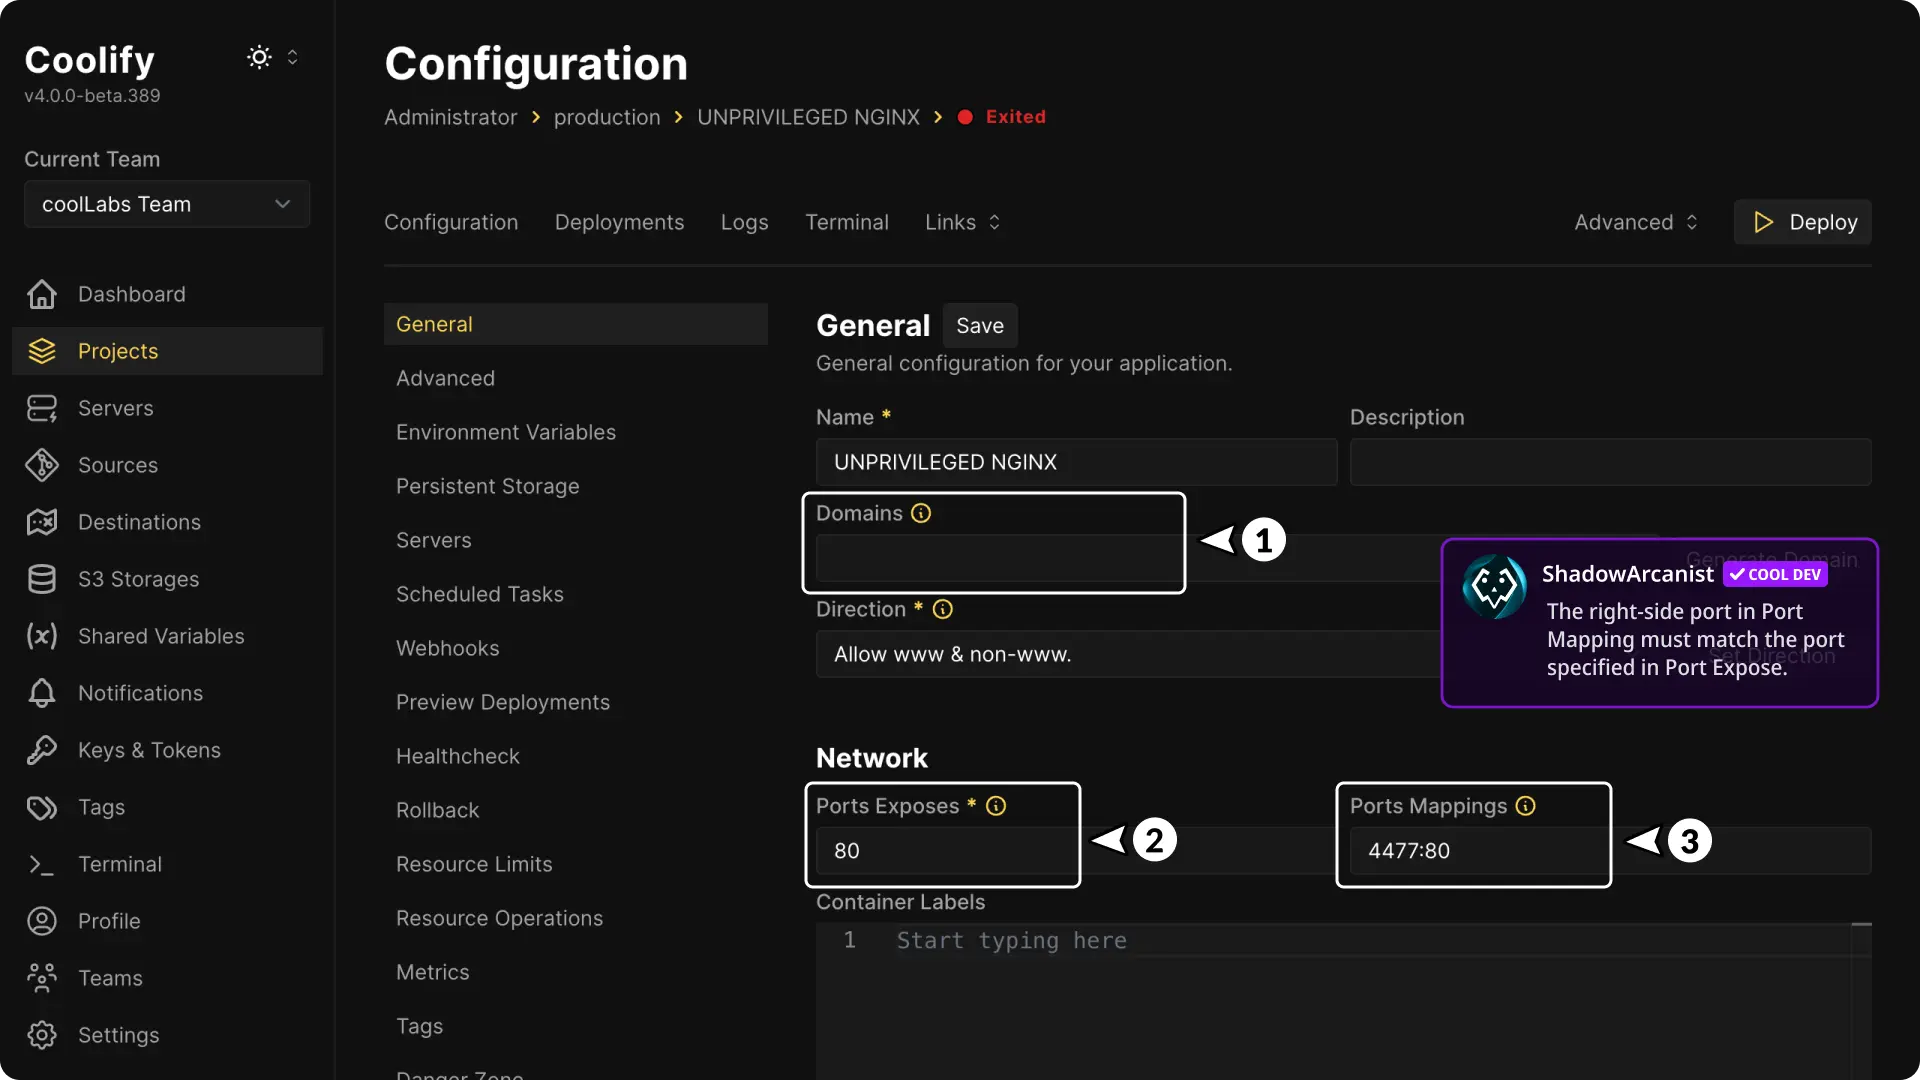
1. Setup your app for tunneling
To setup your app for tunneling, follow these steps:
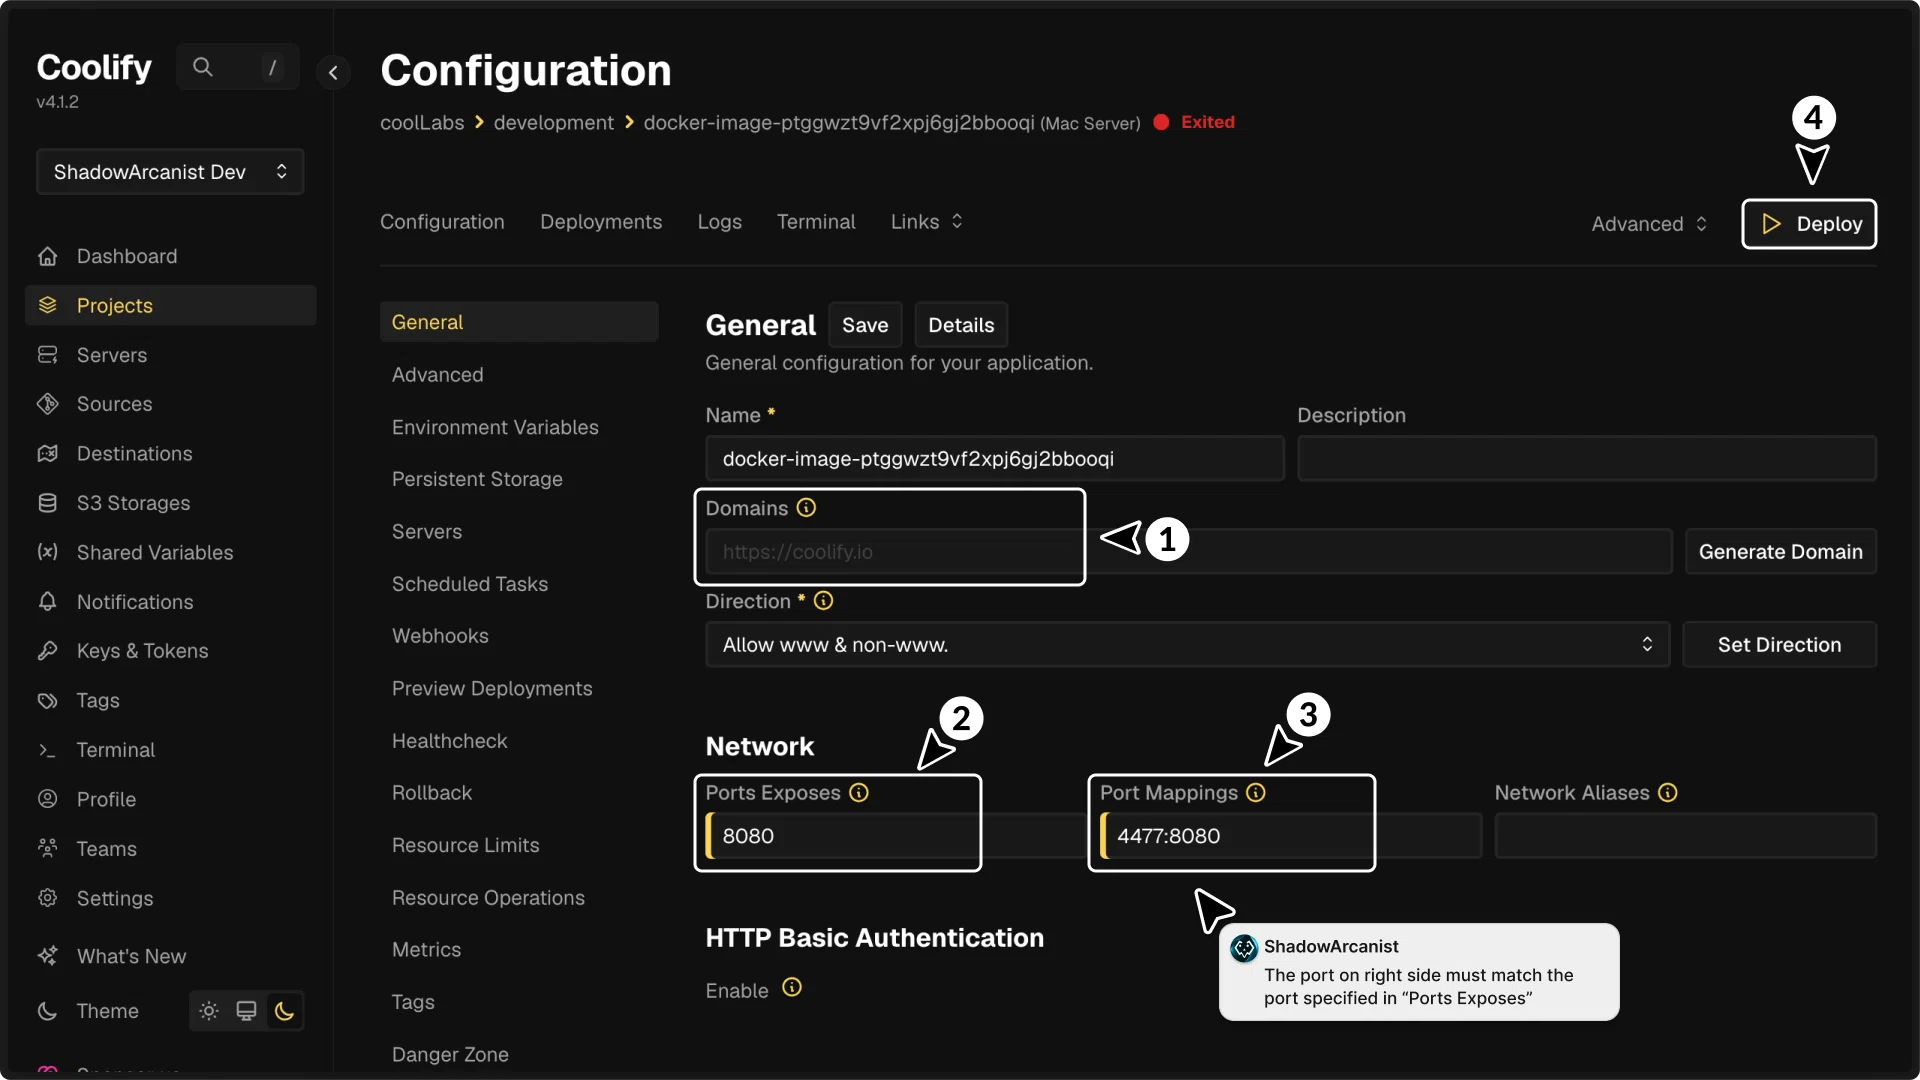
- Remove all domains from the Domains field.
- Set the correct port in Ports Exposed (the port your app uses).
- Set the correct ports in Port Mappings (left is the host port, right is the app port).
- Deploy your app by clicking the Deploy button.
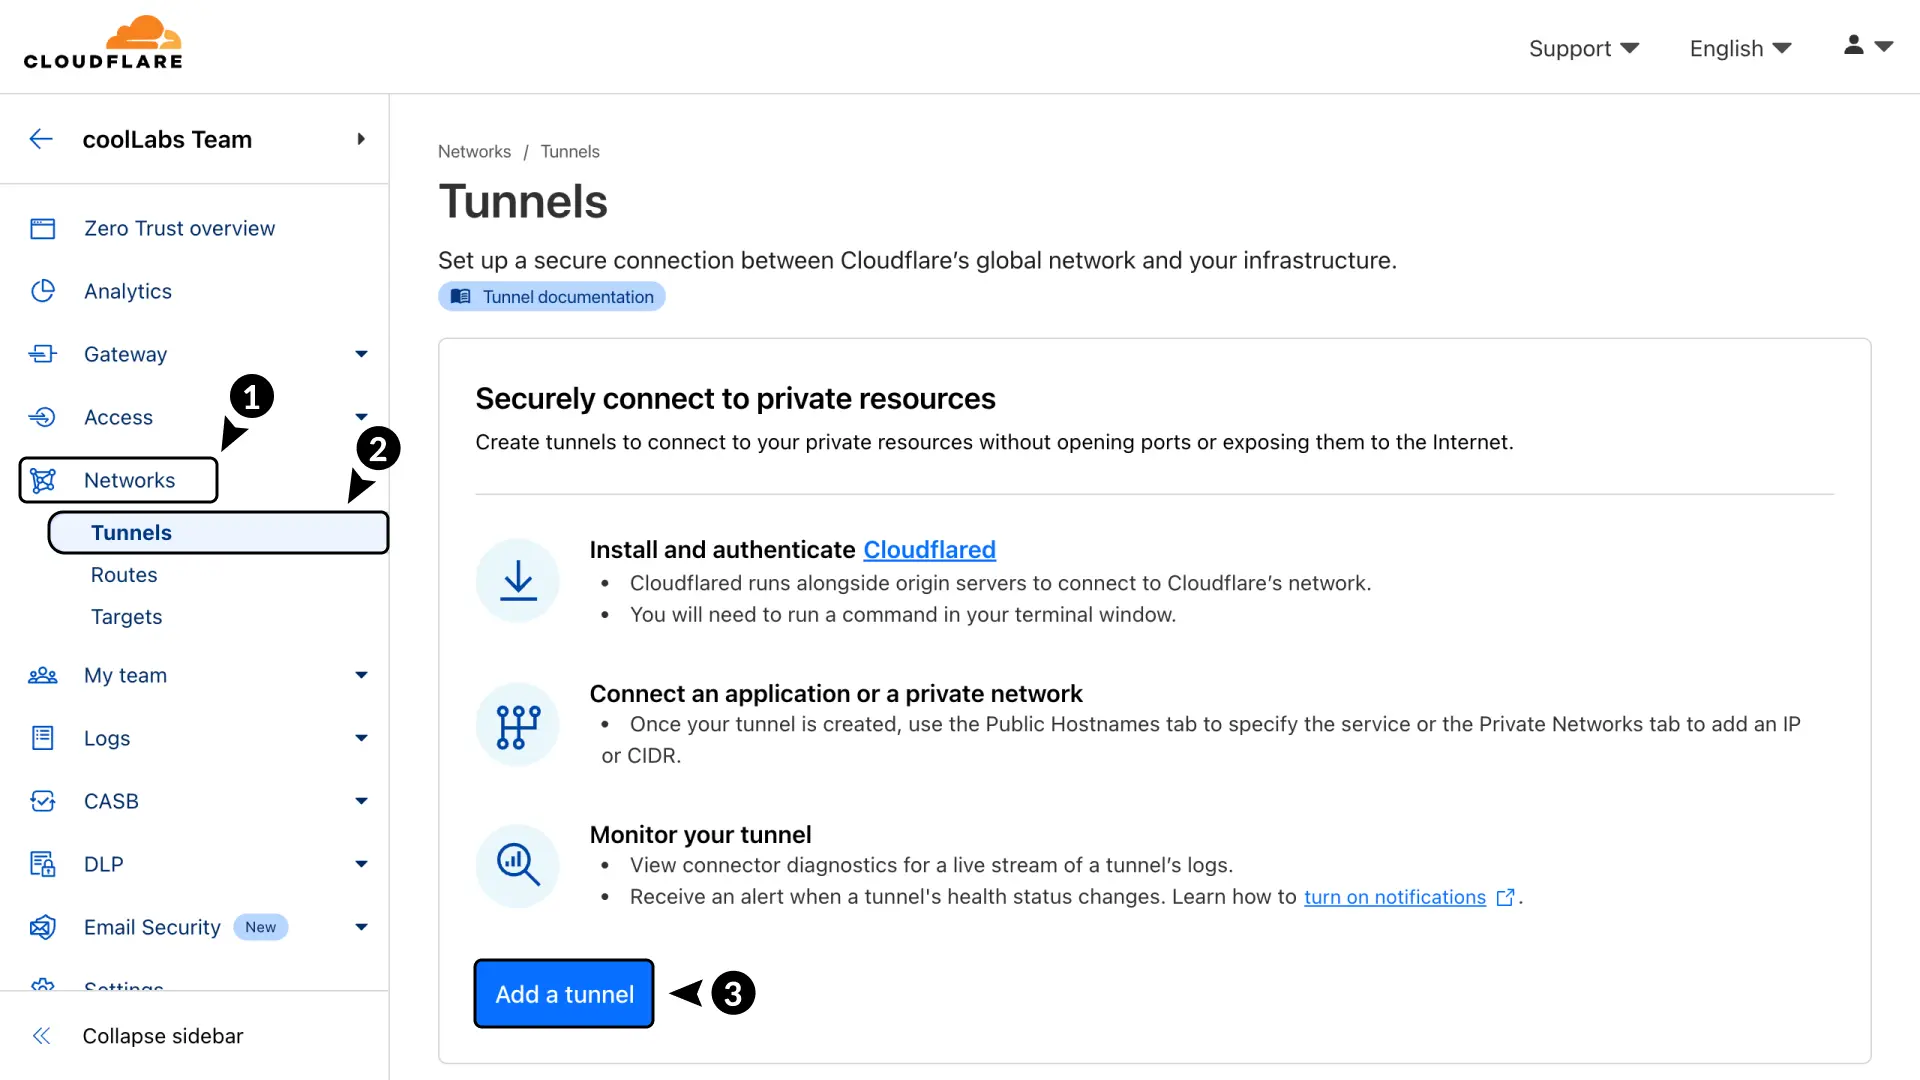
2. Create a Cloudflare Tunnel
To create a Cloudflare Tunnel, first log in to your Cloudflare dashboard
- Go to Networking in the sidebar.
- Click on Tunnels
- Click on Create tunnel button
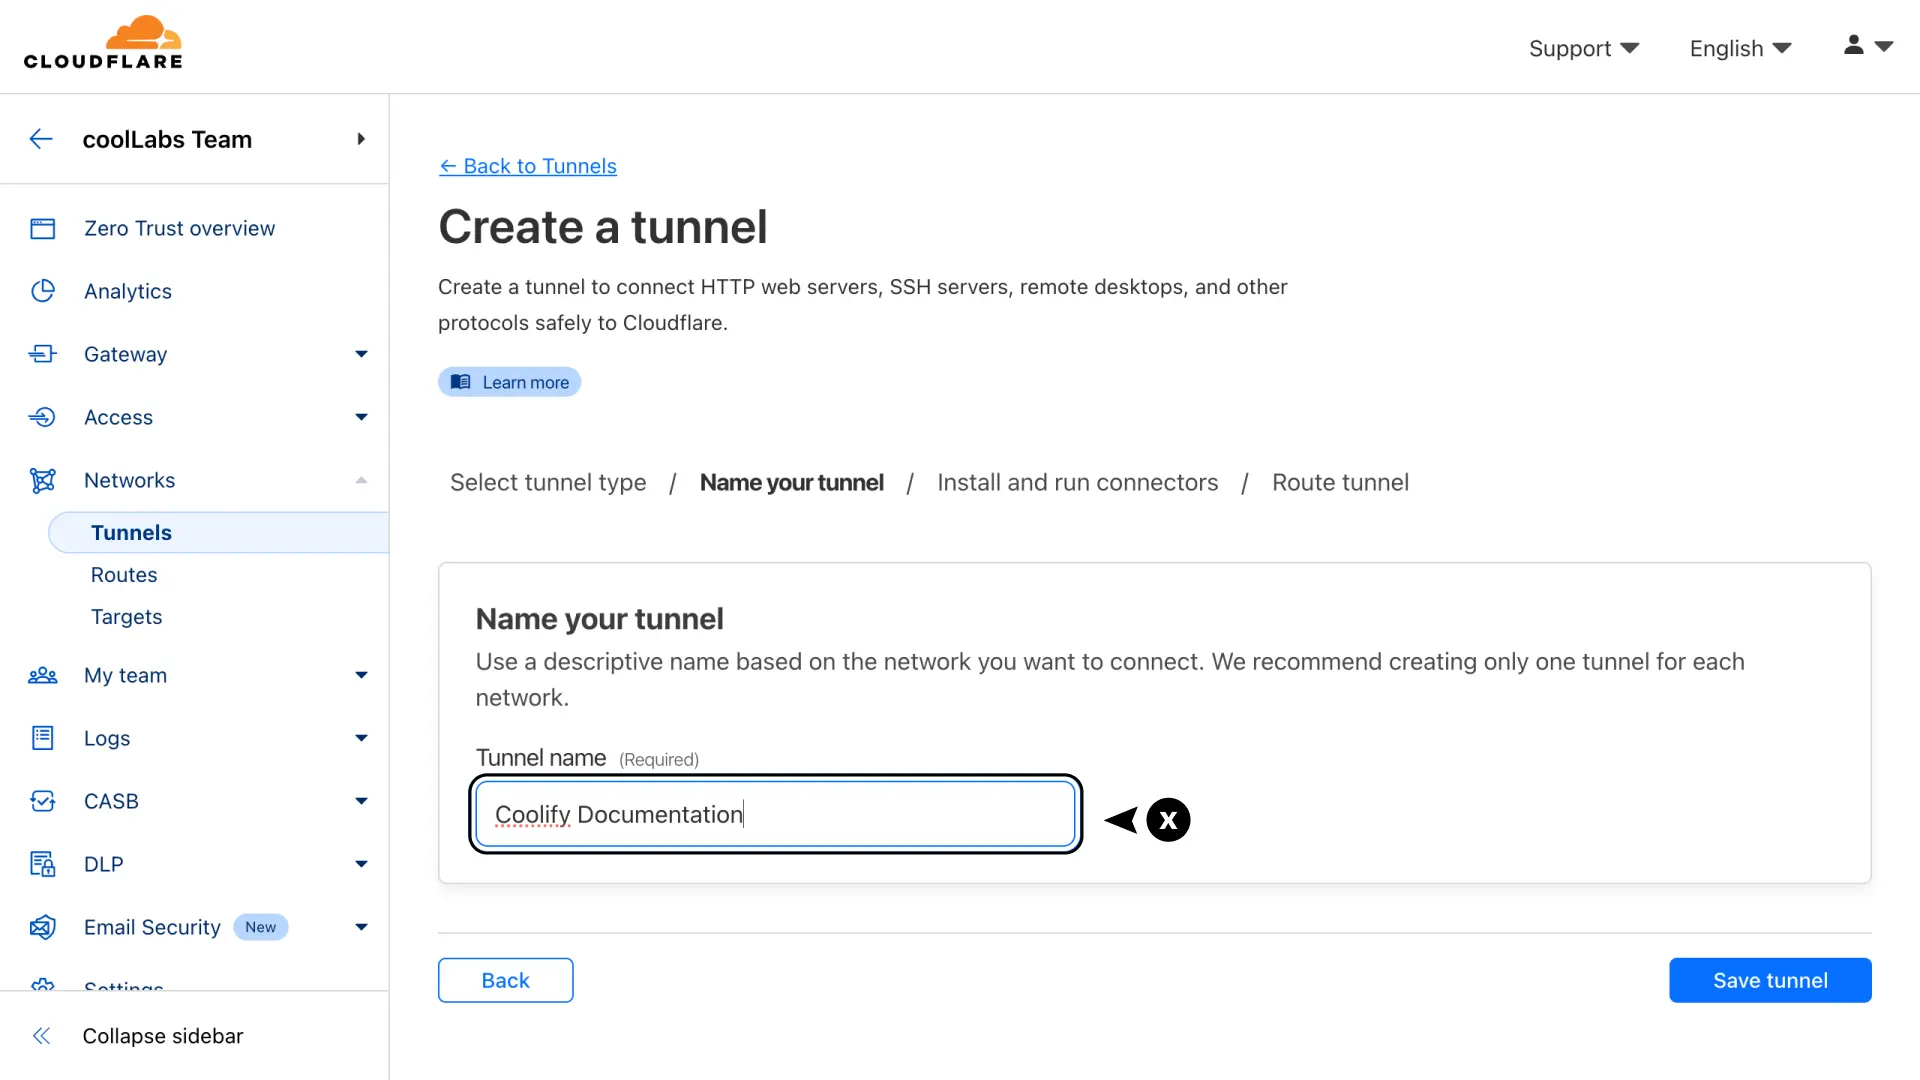
You will be prompted to enter a tunnel name. Enter a name that you prefer and click on Create tunnel button.
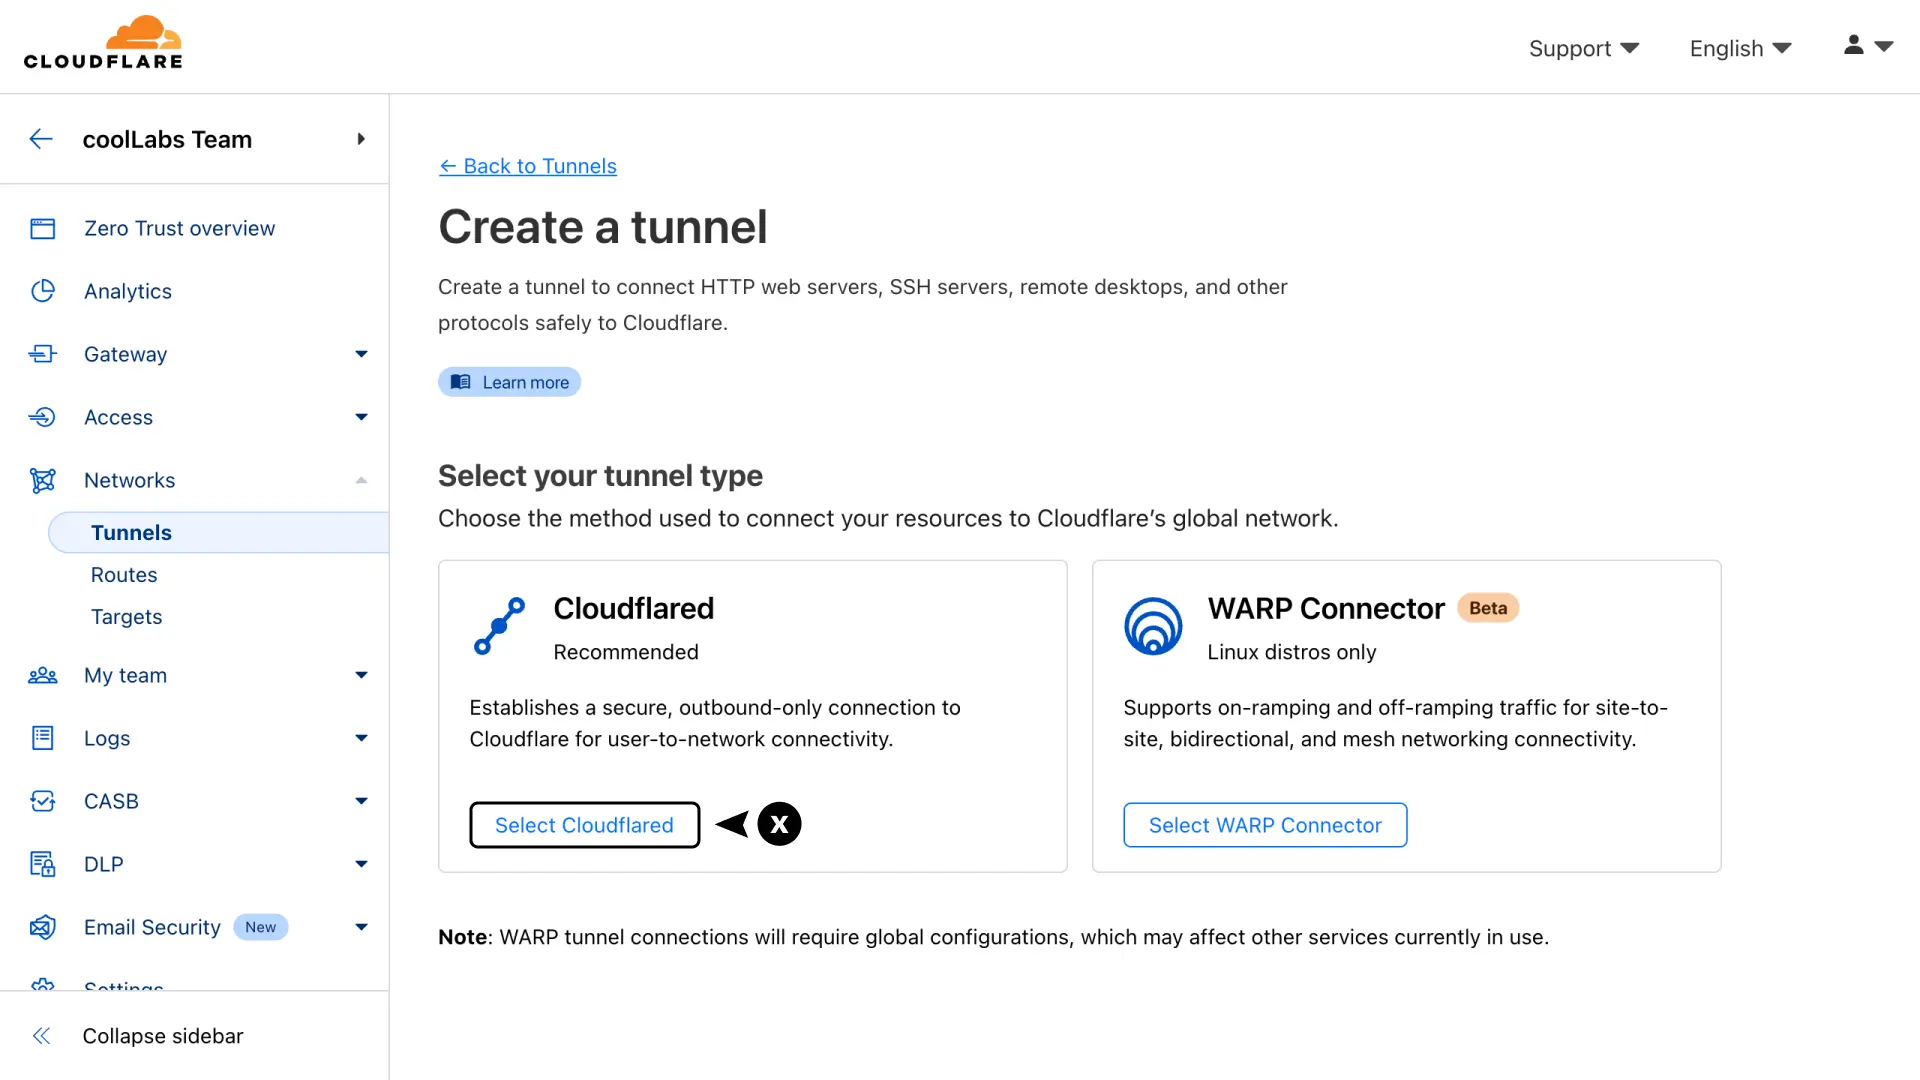
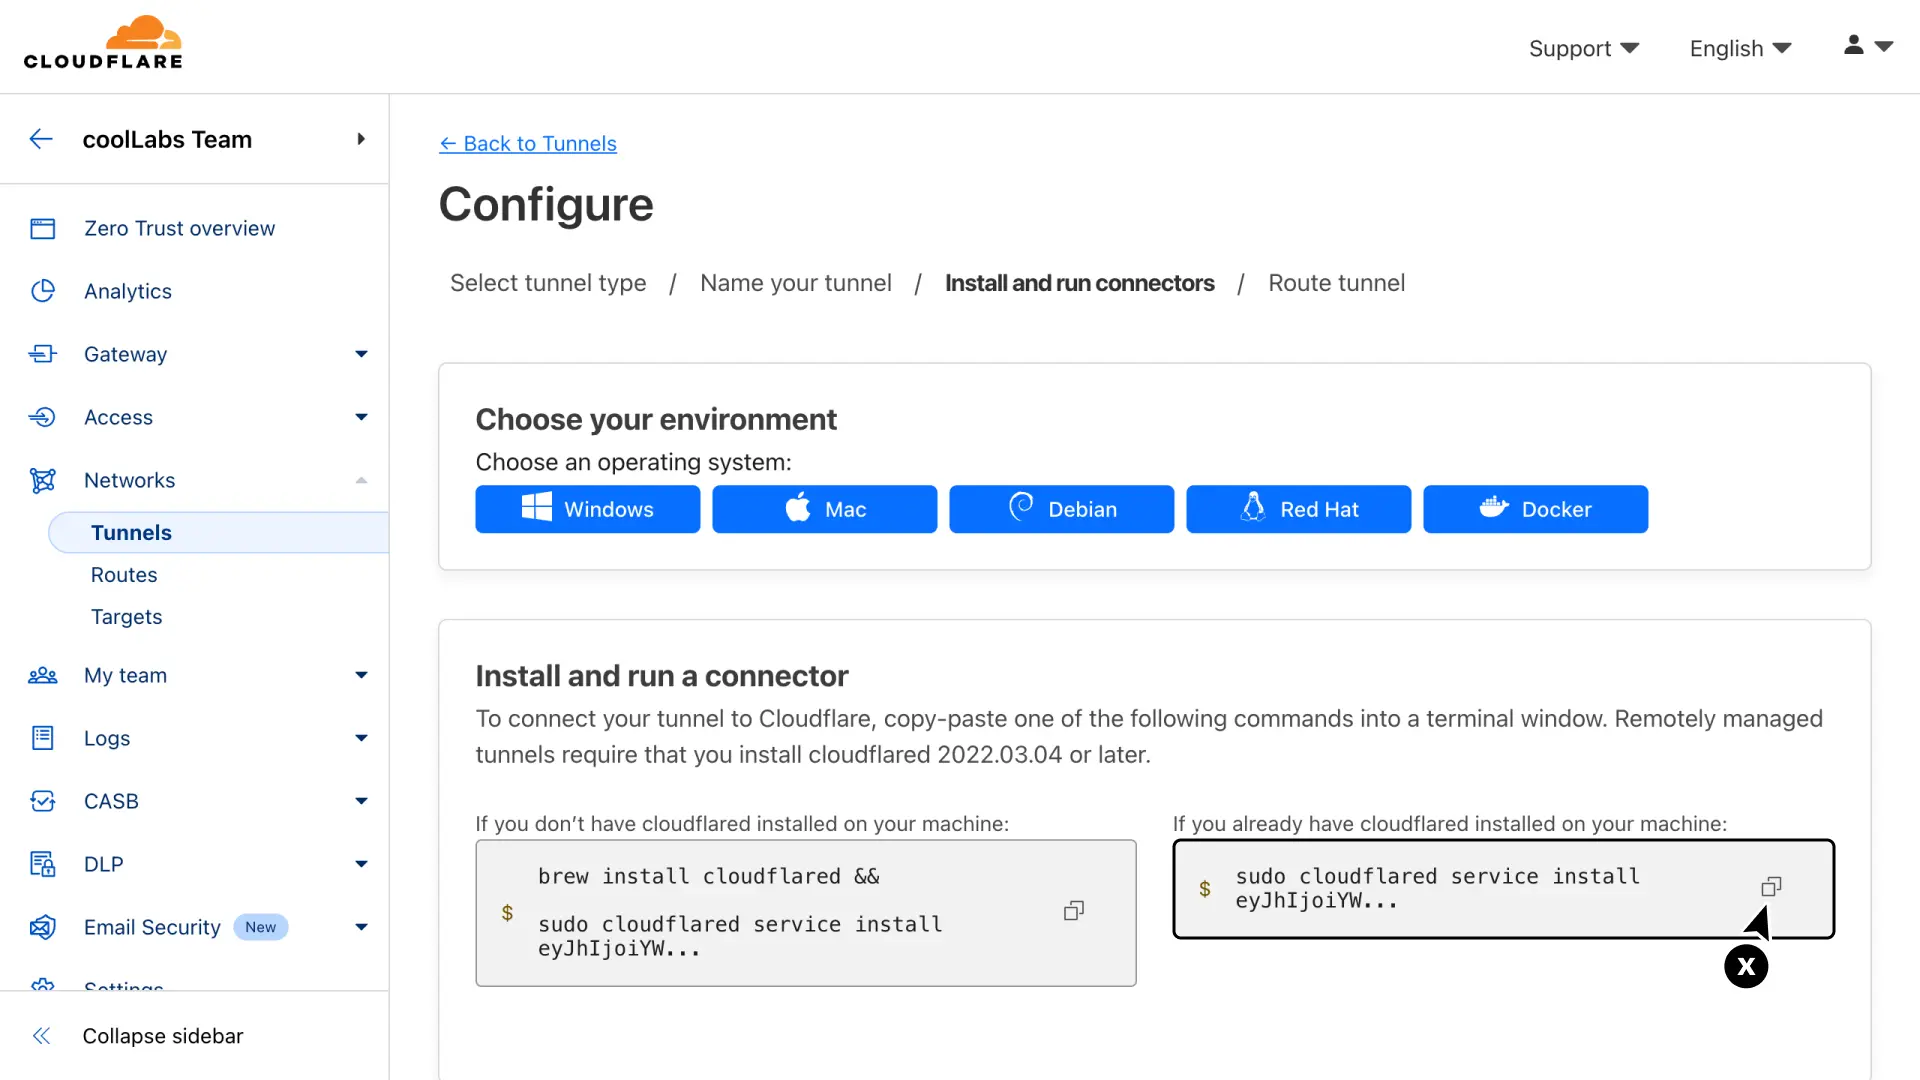
- Select the Docker option
- Copy the docker run command, which contains the token for your tunnel (token starts with "
eyJ"). Make sure to save only the token, removing the command part before it, and store it in a safe place, as we need it later.
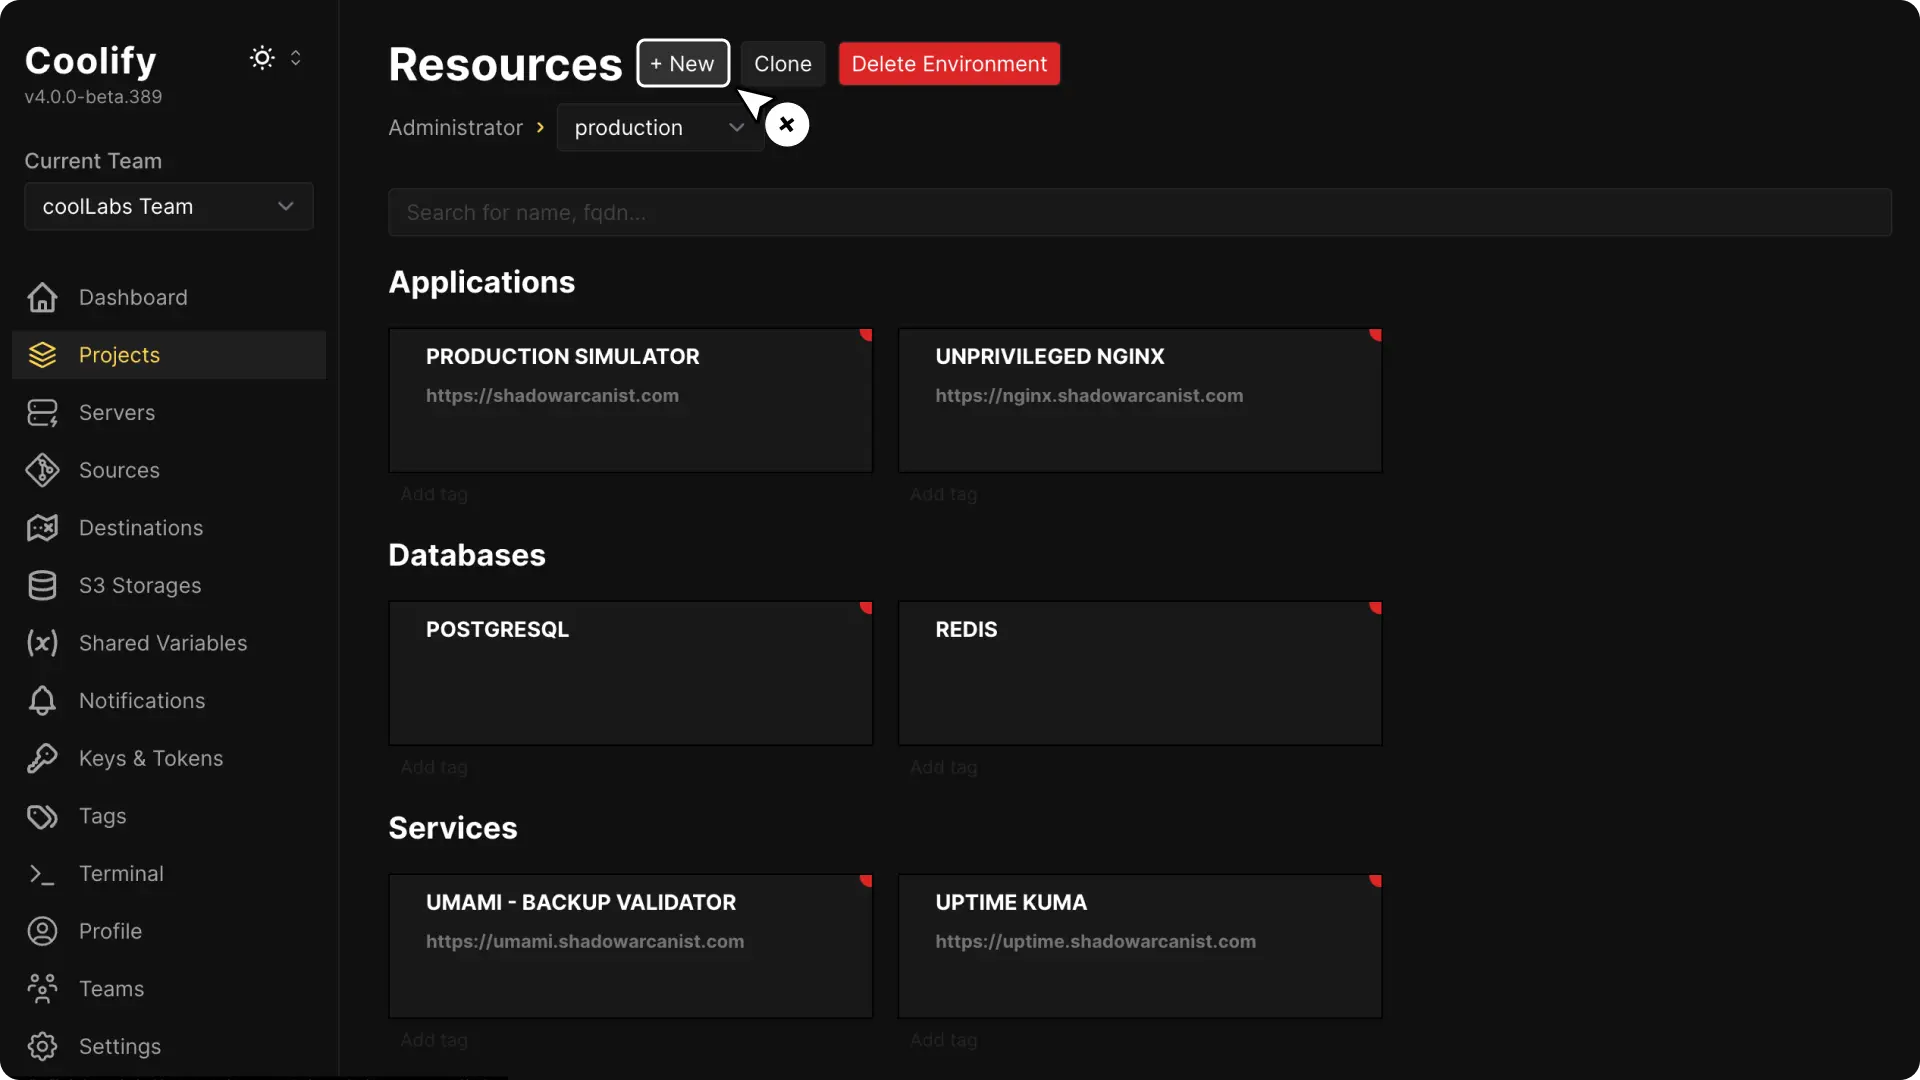
3. Deploy cloudflared on Coolify
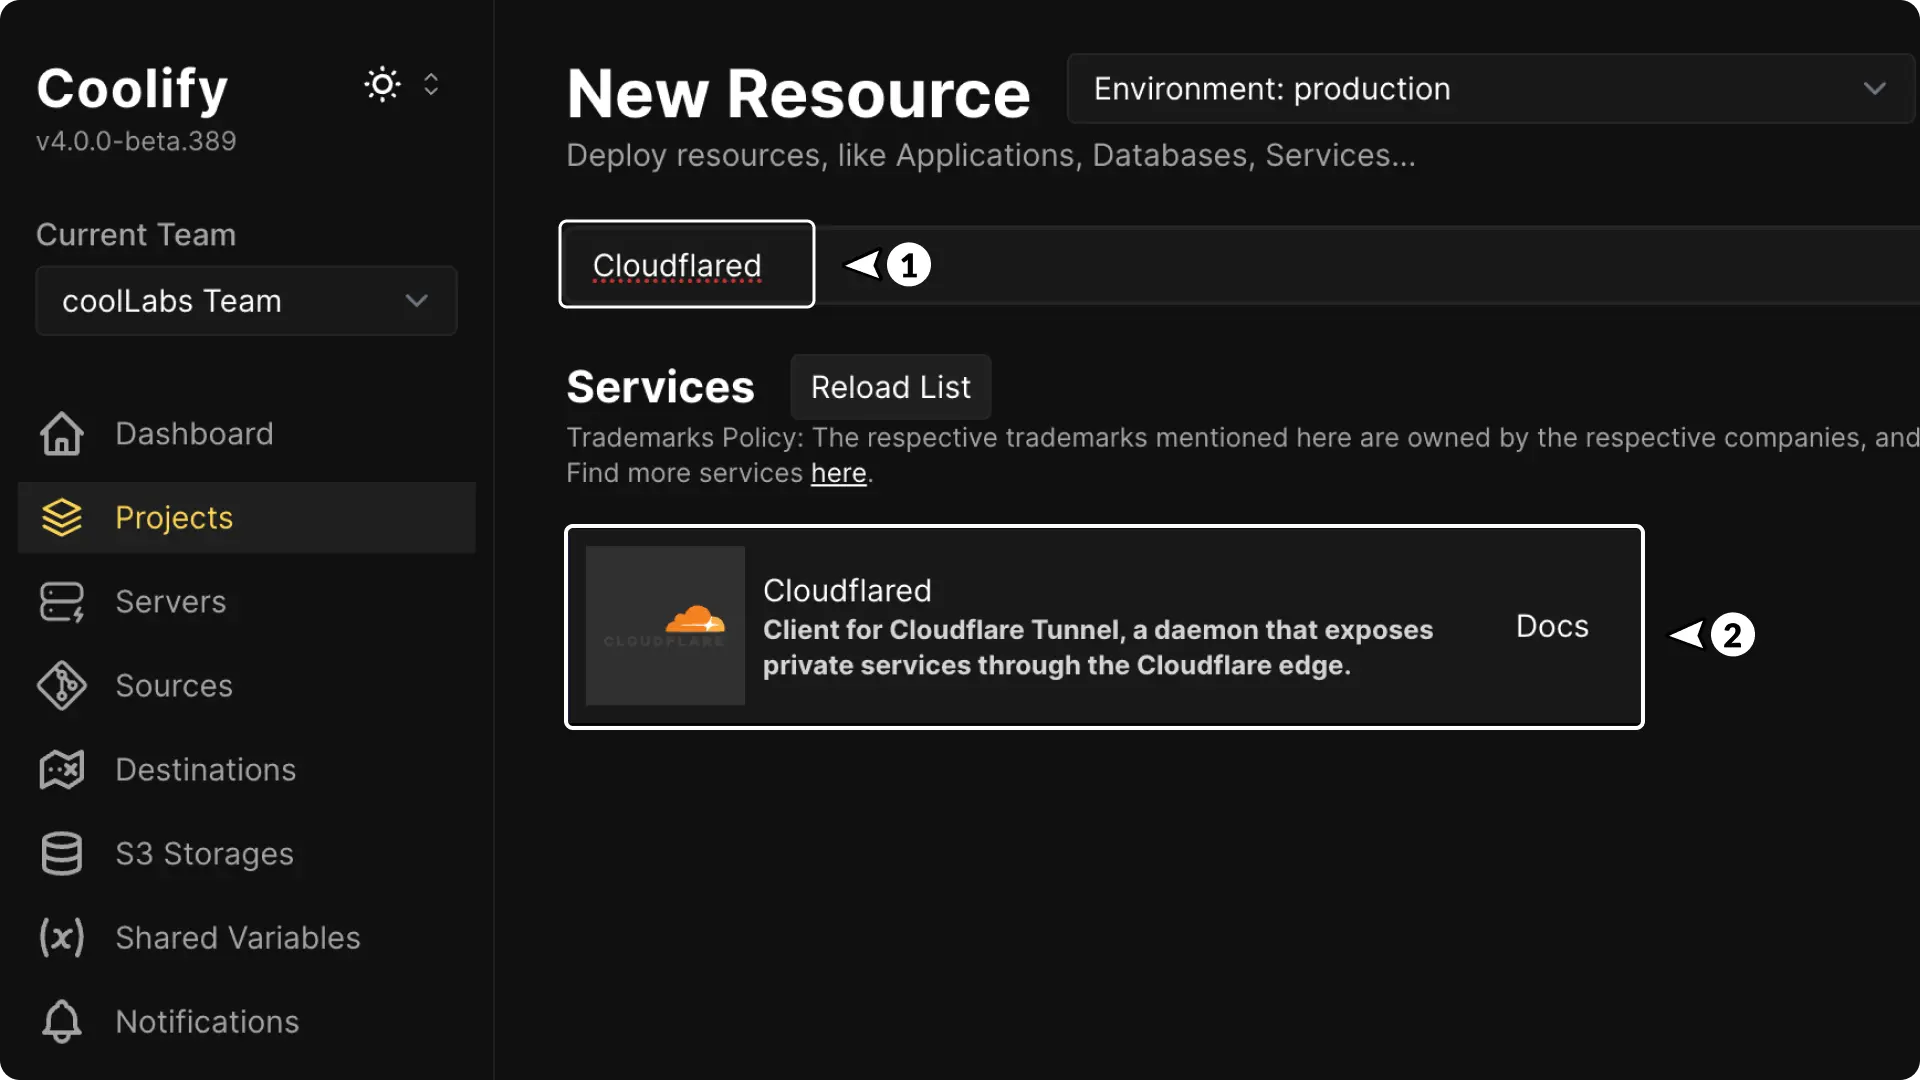
Go to your project on Coolify dashboard and click the + New button to create a new resource.
Search for Cloudflared and click on it.
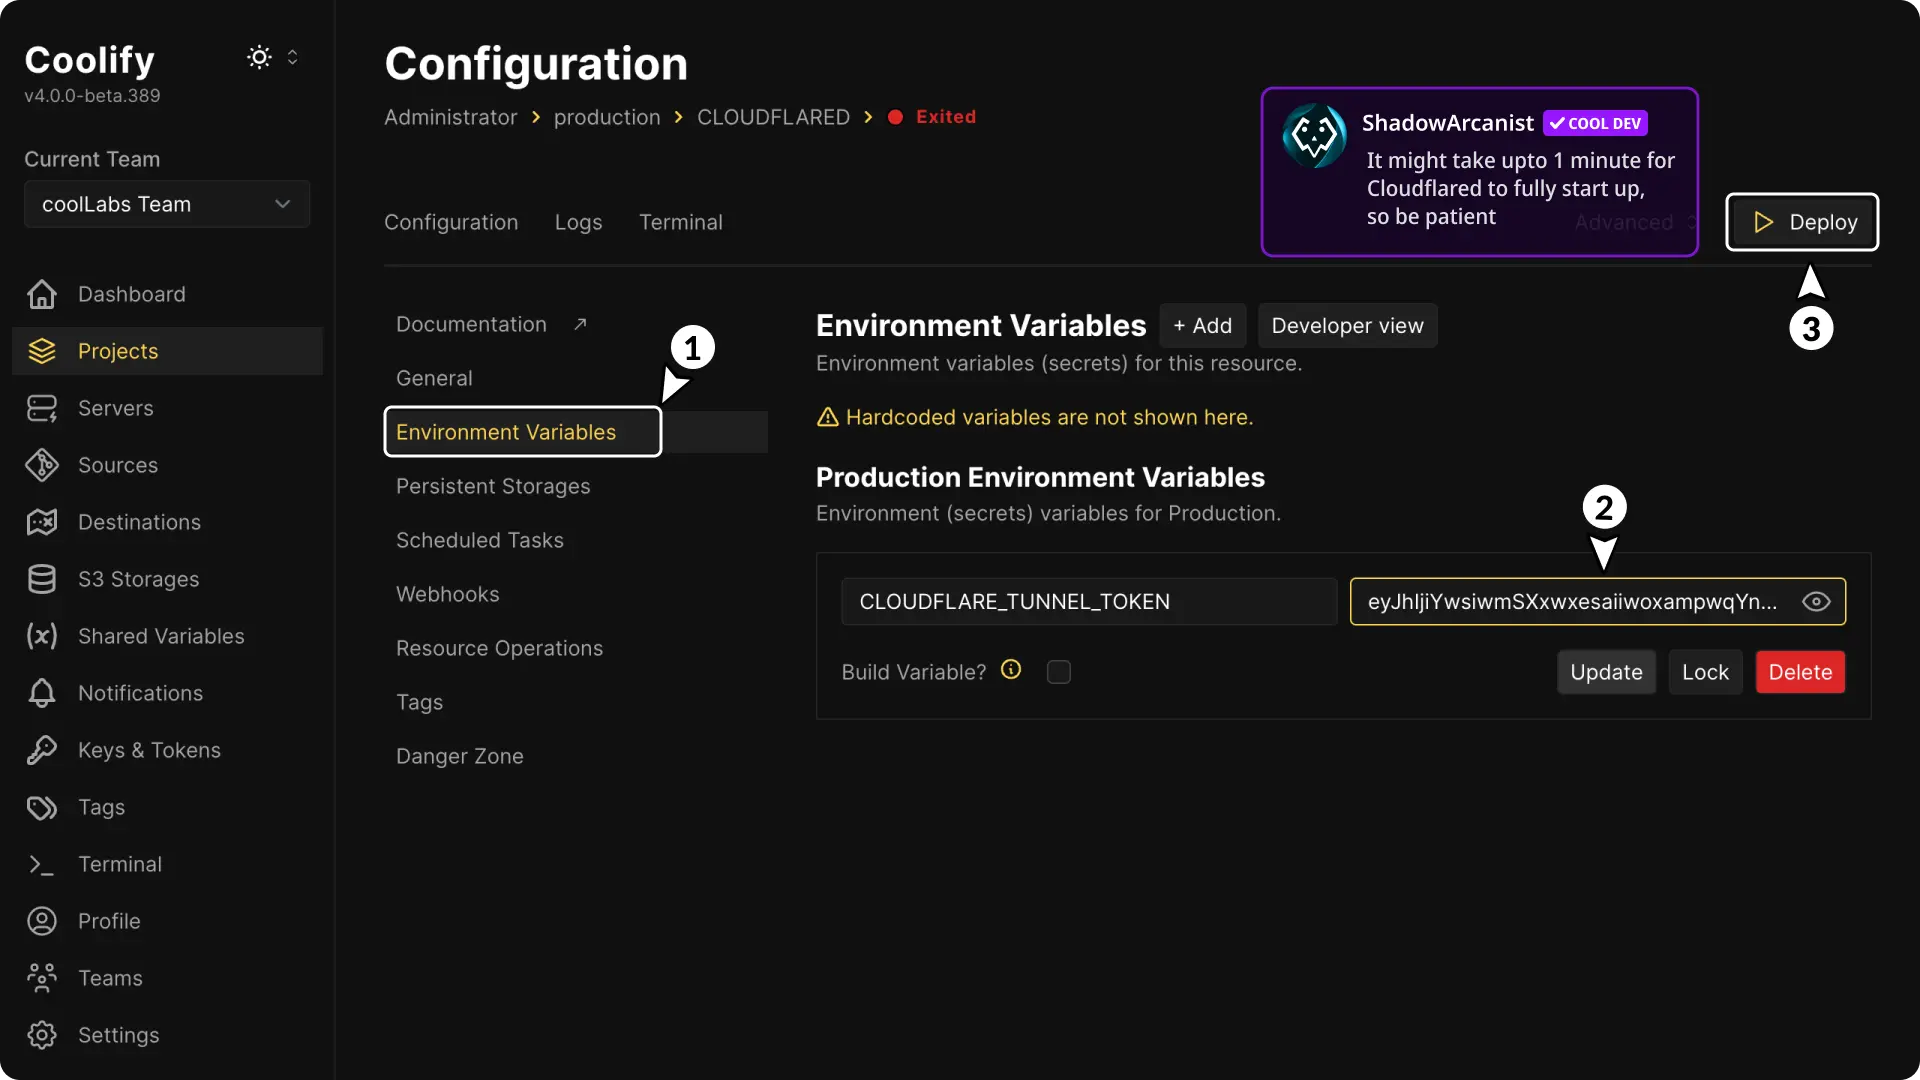
Go to the Environment Variables page, enter your tunnel token, and deploy the Cloudflared app.
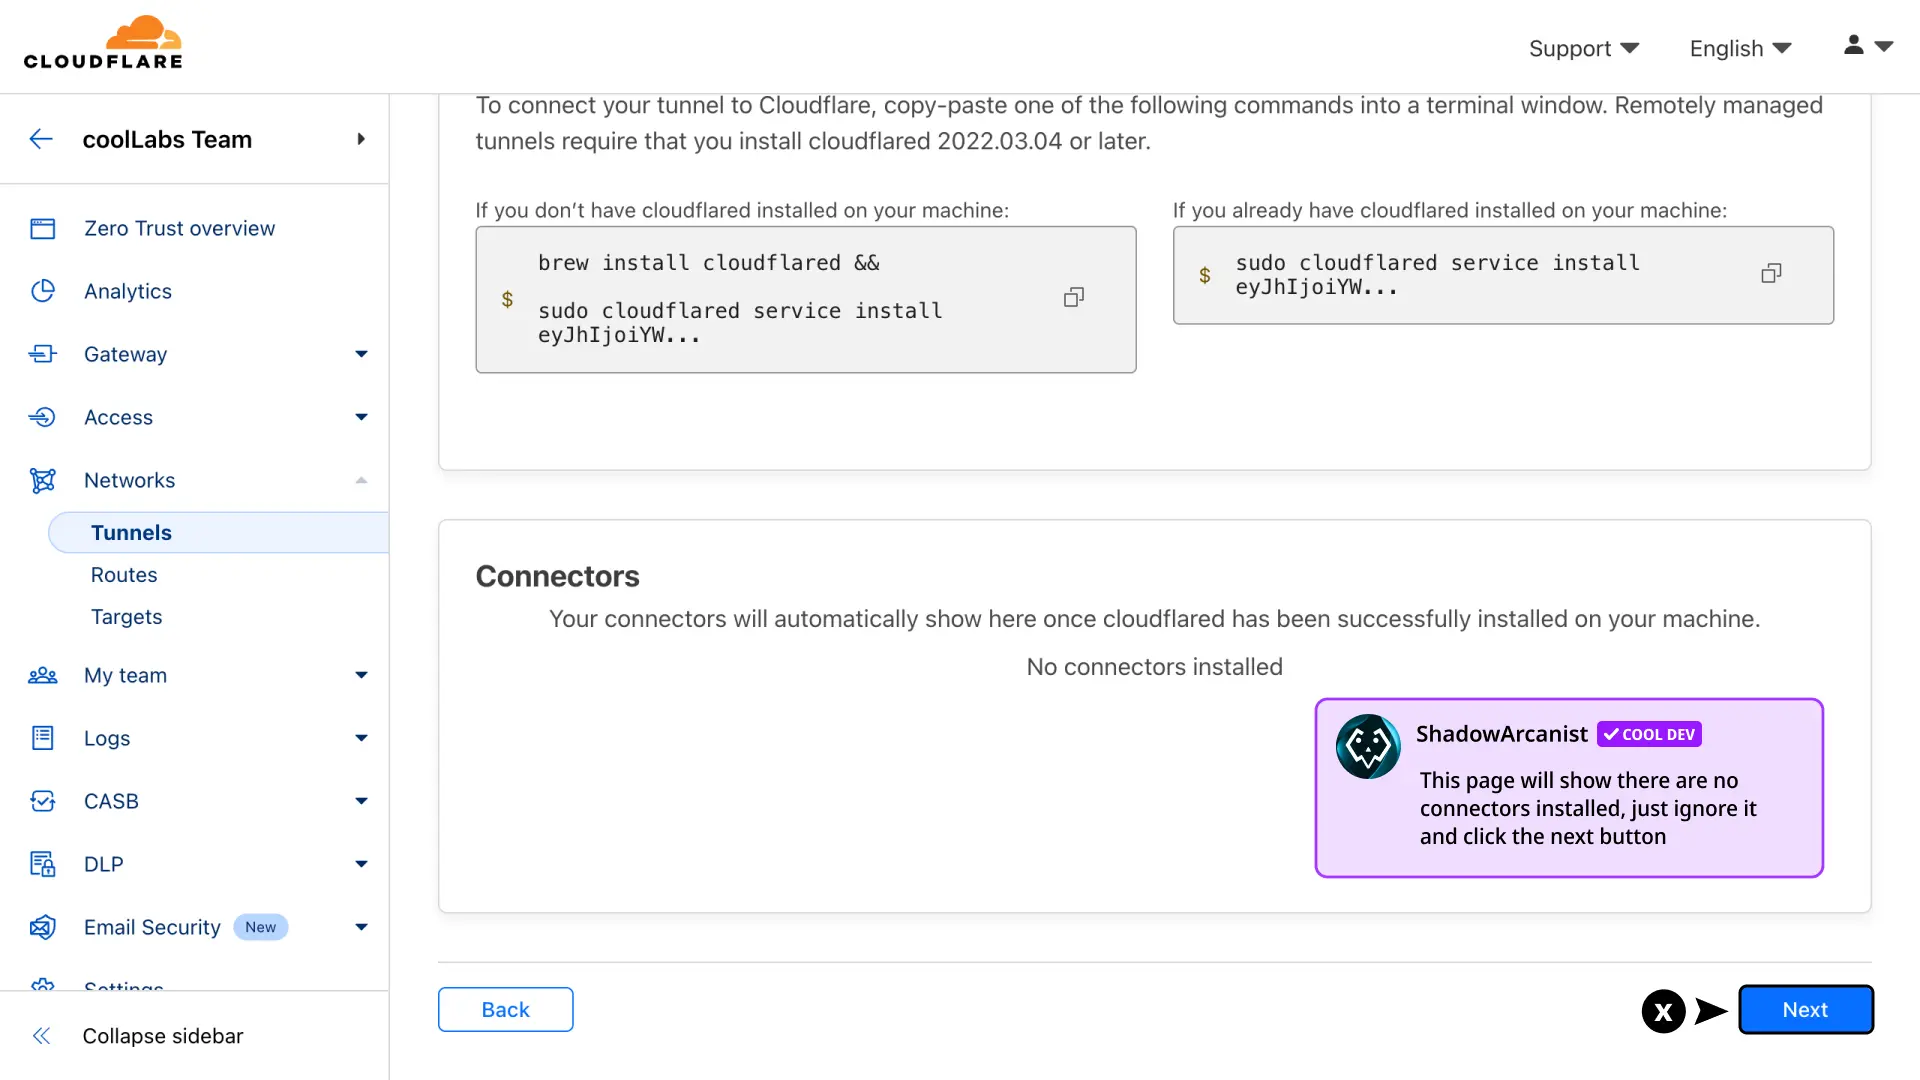
Once cloudflared starts running you will be able to see it's status on Cloudflare dashboard
Click on continue button to create the tunnel.
4. Set Up TLS Encryption
To make Cloudflare use stricter encryption when connecting to your server, configure your TLS encryption in Cloudflare:
- Go to SSL/TLS in Cloudflare.
- Select Overview.
- Click Configure button
- Choose Full (Strict) as the encryption mode.
- Click Save button
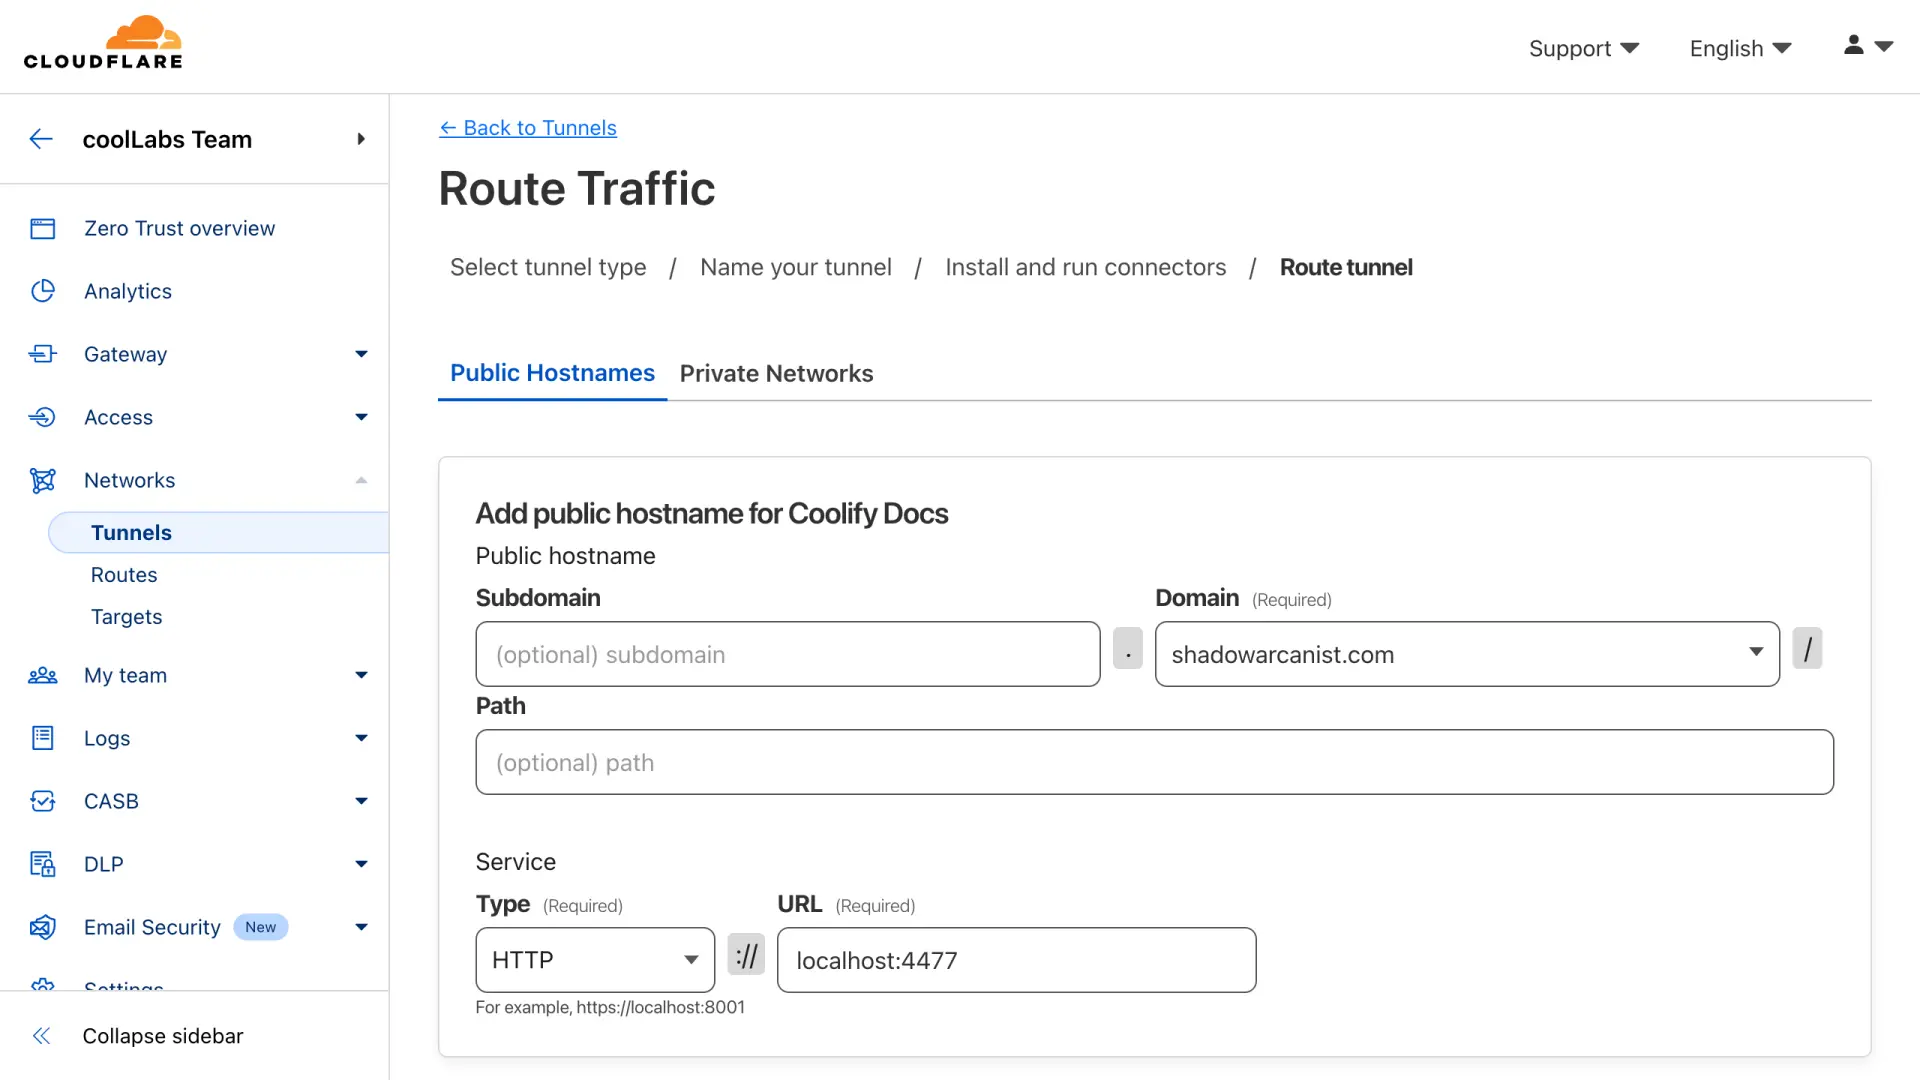
5. Configure tunnel routes
- Click on your tunnel
- Click on Configure option
- Select Routes.
- Click Add route button
- Select Published Application as the route type
- Subdomain - (Optional) You can make your resource accessible on any subdomain/domain. For this guide, we are using the
helixasubdomain. - Domain - Choose the domain you want to use for the tunnel.
- Path - Leave this field empty.
- Service URL - Enter http://localhost:4477 (this is very important). The port 4477 is the one we mapped to the host system in Step 1.
- After filling in the details, click the Add route button.
Congratulations! You've successfully set up a resource that can be accessed by anyone on the internet on your domain.
Tunnel Multiple Resources
The easiest way to tunnel multiple resources is by following our Tunnel All Resources guide, which uses Coolify's built-in proxy.
However, if you prefer not to use the proxy, there are two alternative methods:
If you want to expose different apps individually, you can follow our Tunnel All Resources, or take an alternate approach:
-
Follow Step 1 for your new resource.
-
Create a new route on Cloudflare Tunnel as described in Step 5.
There’s no need to create a separate tunnel for each resources, simply create a new route and point it to the port your app is listening on.
Tunneling Coolify itself to make it accessible over a domain requires a bit more manual configuration. Here's how you can set it up:
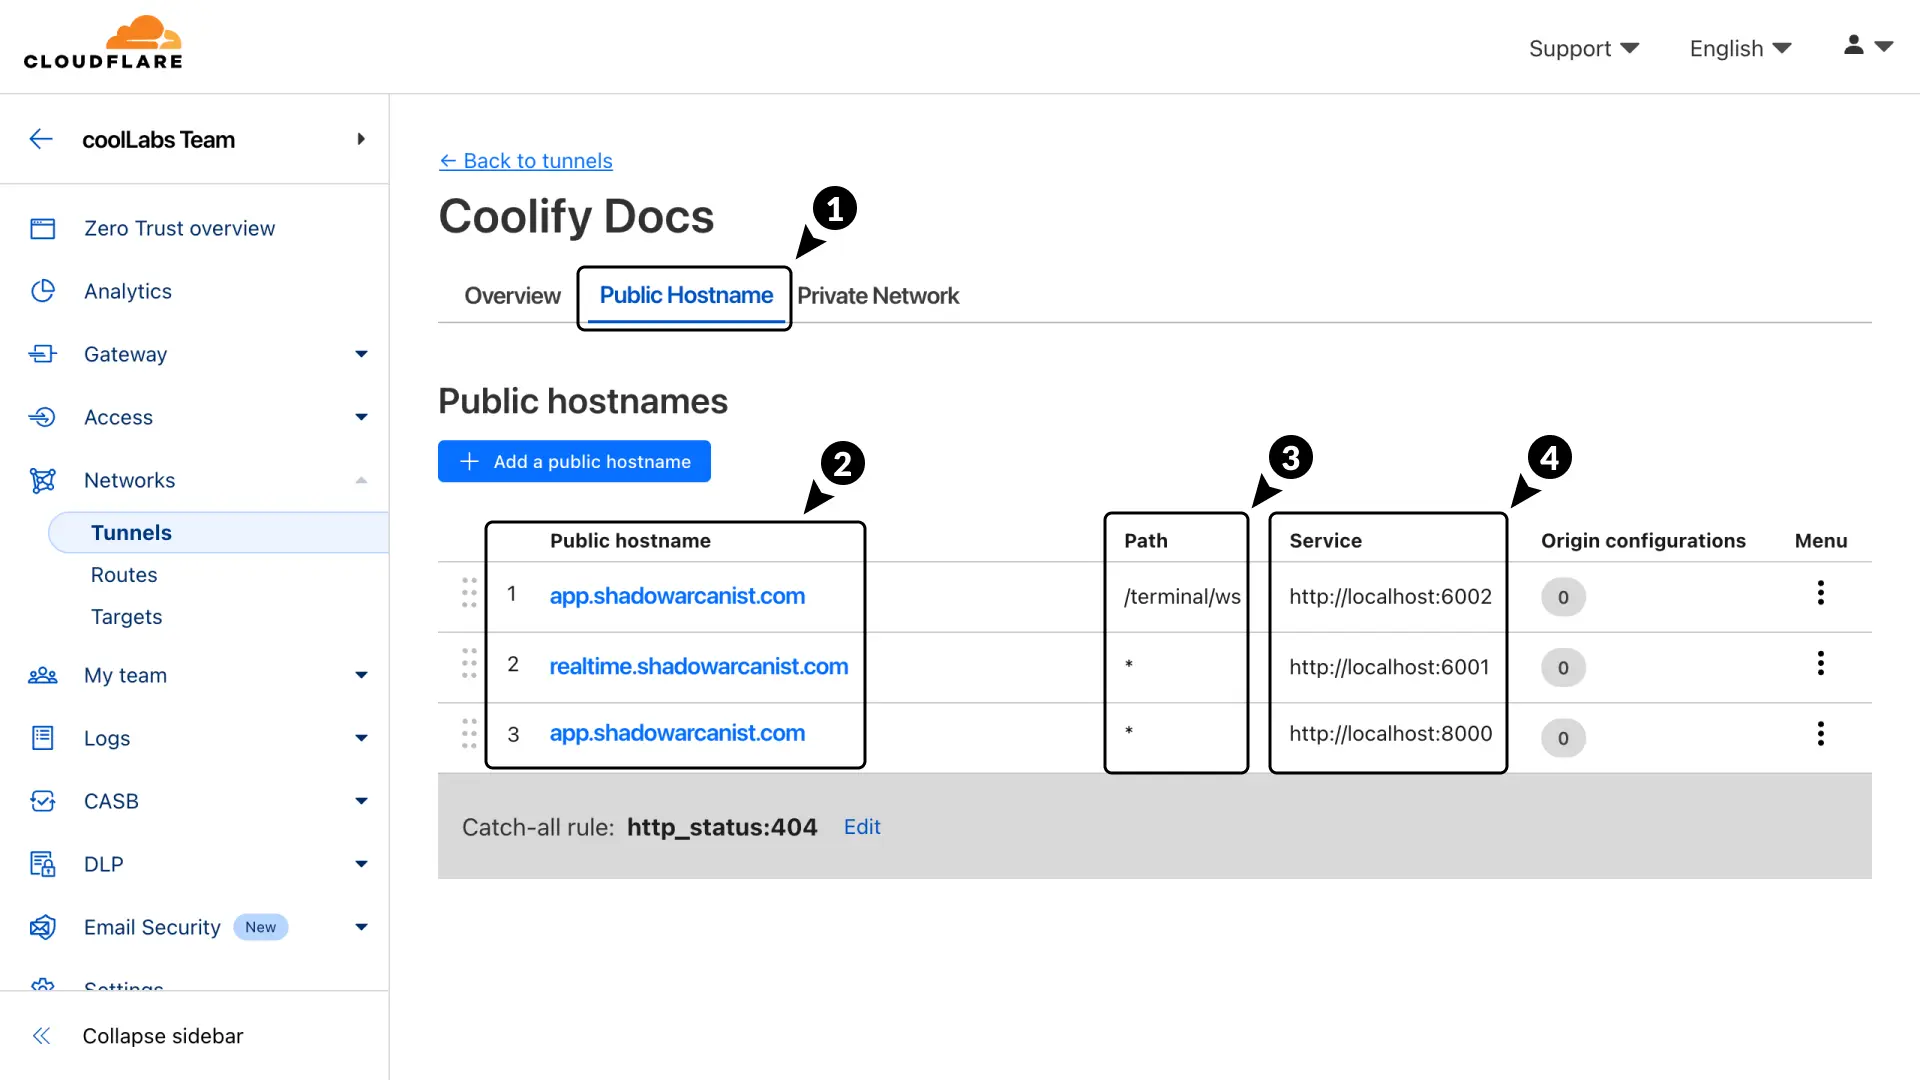
1. Create routes in Cloudflare Tunnel
Follow Step 5 to create routes for each service Coolify exposes. Use the following mapping:
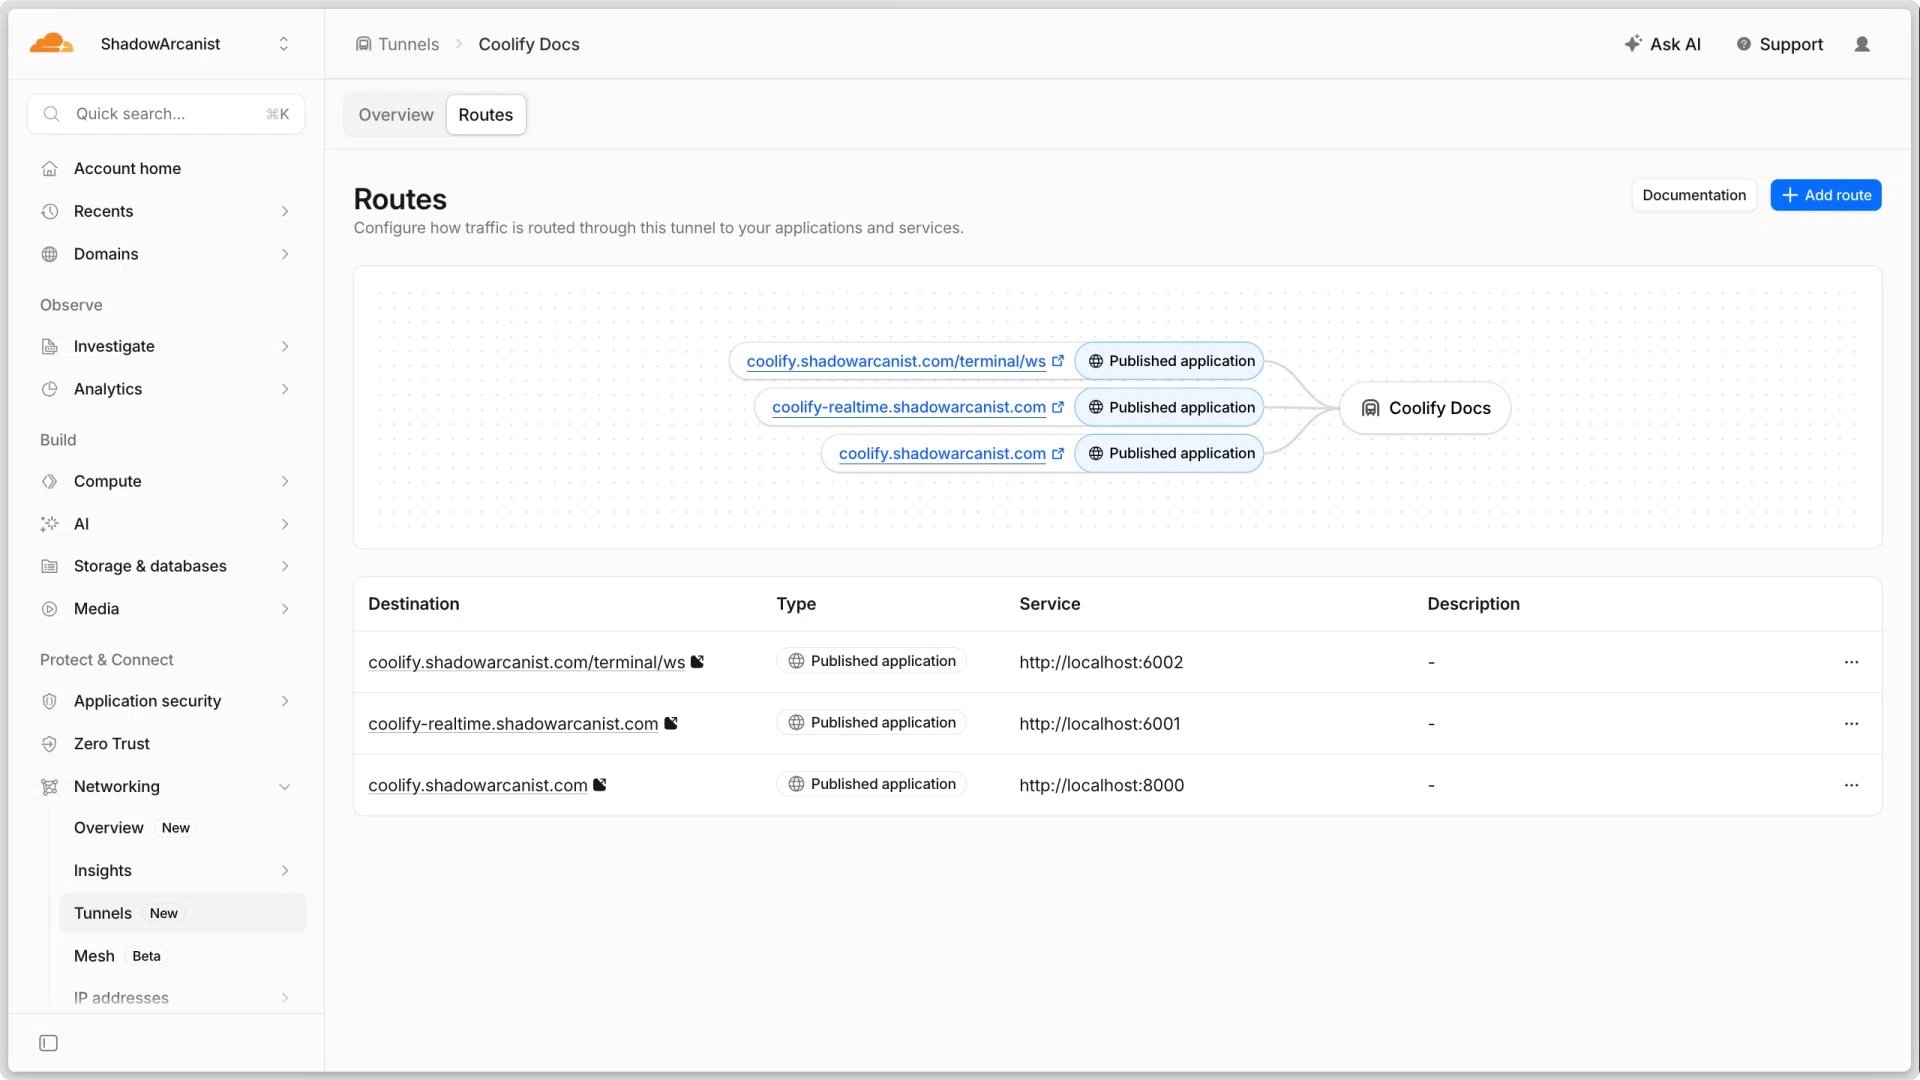
| Domain / Path | Service | Purpose |
|---|---|---|
coolify.shadowarcanist.com/terminal/ws | http://localhost:6002 | WebSocket terminal |
coolify-realtime.shadowarcanist.com | http://localhost:6001 | Realtime server |
coolify.shadowarcanist.com | http://localhost:8000 | Coolify dashboard |
HEADS UP!
The order of the routes matters! Be sure to match it exactly as shown above.
2. Update Coolify’s .env File
After creating public hostnames, update the .env file in your Coolify instance located at /data/coolify/source to enable connections to the realtime server. Add the following lines:
APP_ID=<random string>
APP_KEY=<random string>
APP_NAME=Coolify
DB_PASSWORD=<random string>
PUSHER_APP_ID=<random string>
PUSHER_APP_KEY=<random string>
PUSHER_APP_SECRET=<random string>
REDIS_PASSWORD=<random string>

###########
# Add these lines
PUSHER_HOST=coolify-realtime.shadowarcanist.com
PUSHER_PORT=443
###########
This ensures that Coolify uses the Cloudflare Tunnel for its realtime server.
3. Restart Coolify
Run the following command to restart Coolify and apply the changes:
curl -fsSL https://cdn.coollabs.io/coolify/install.sh | bash4. Verify the Setup
- Access your Coolify dashboard at
https://coolify.shadowarcanist.com. - Test the realtime functionality by visiting
https://coolify.shadowarcanist.com/realtimein another browser tab. You should see a notification about a test event. - If you know what are you doing, you can check the network tab as well. Search for a websocket connection.
HEADS UP!
If you use a firewall, ensure that the required ports (e.g., 8000, 6001, 6002) are open for internal communication but not exposed to the public internet.
Known issues and Solutions
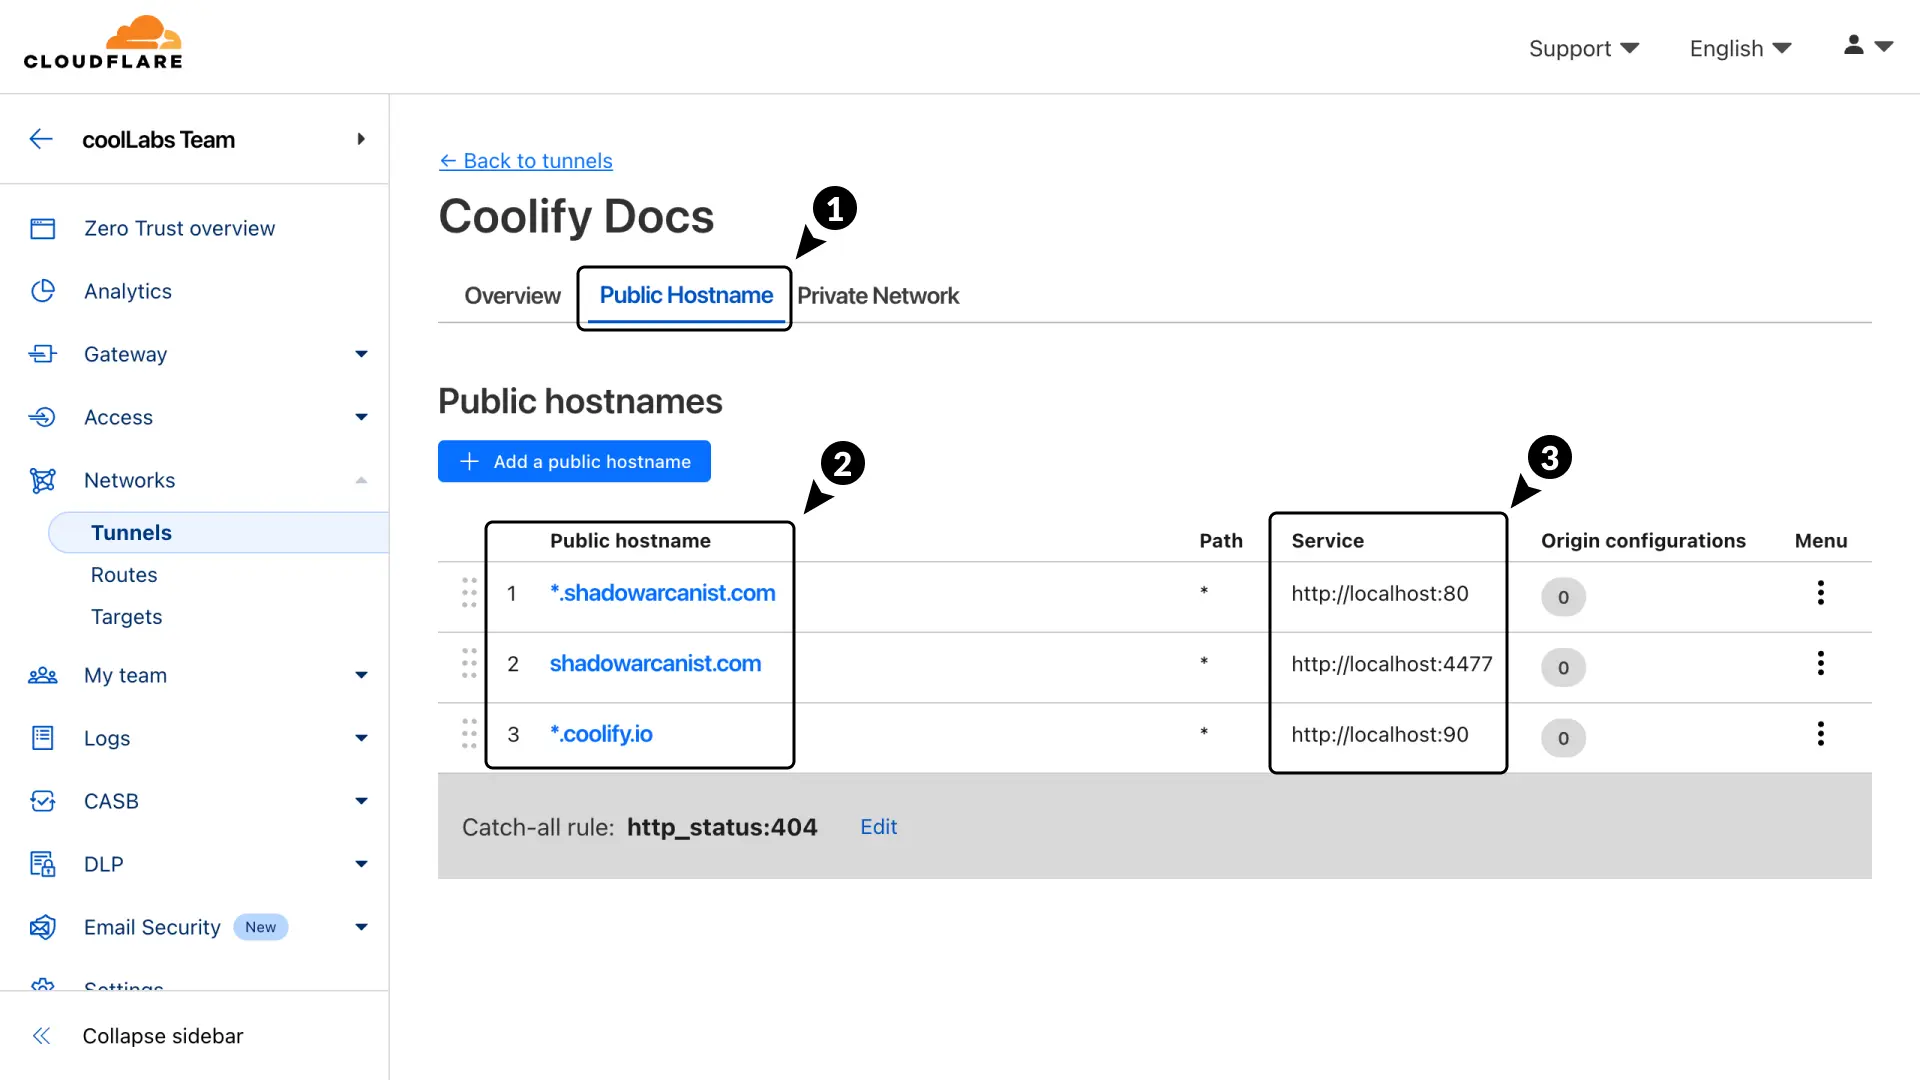
When you create a new routes in Step 5, Cloudflare will create a DNS record for the hostname.
However, if a DNS record for the hostname already exists, Cloudflare won’t update existing record.
In this case, your app won’t work. To fix this issue, follow the steps below:

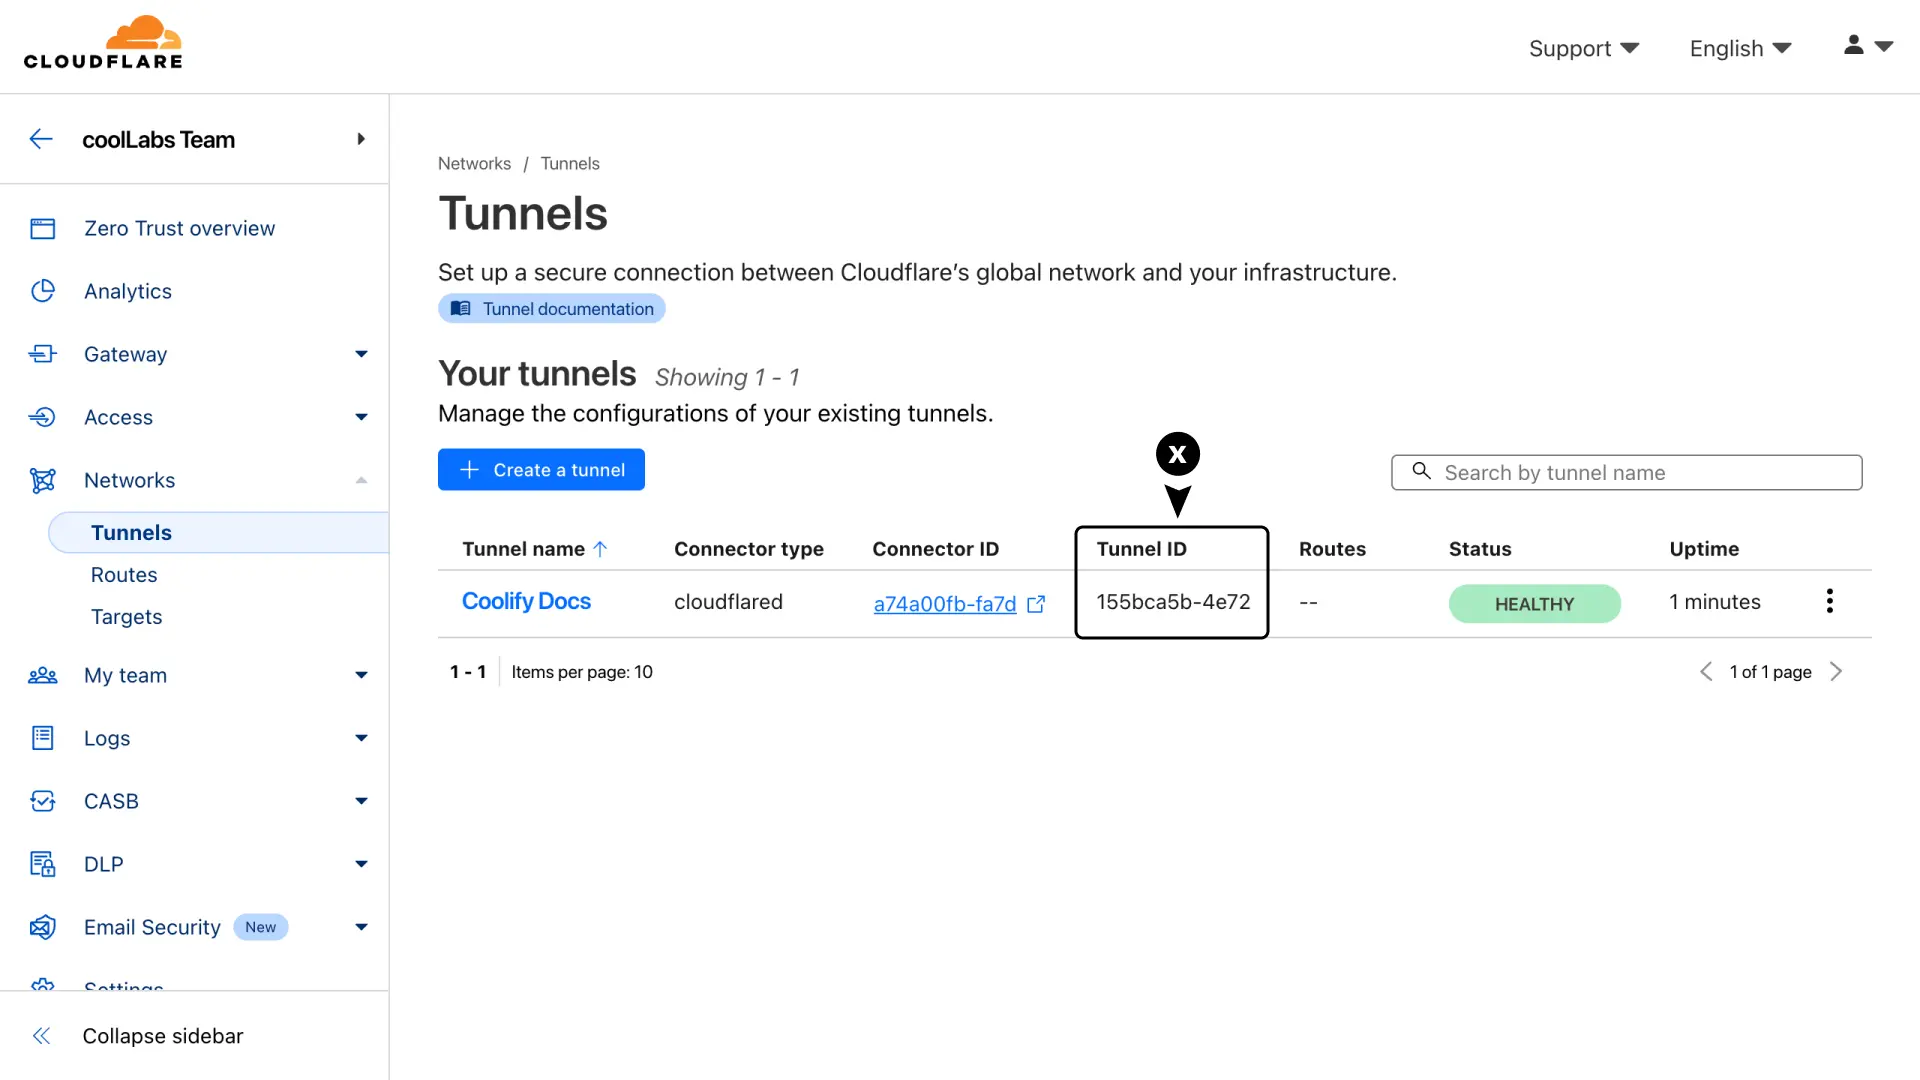
- Click on your tunnel
- Click on Configure option
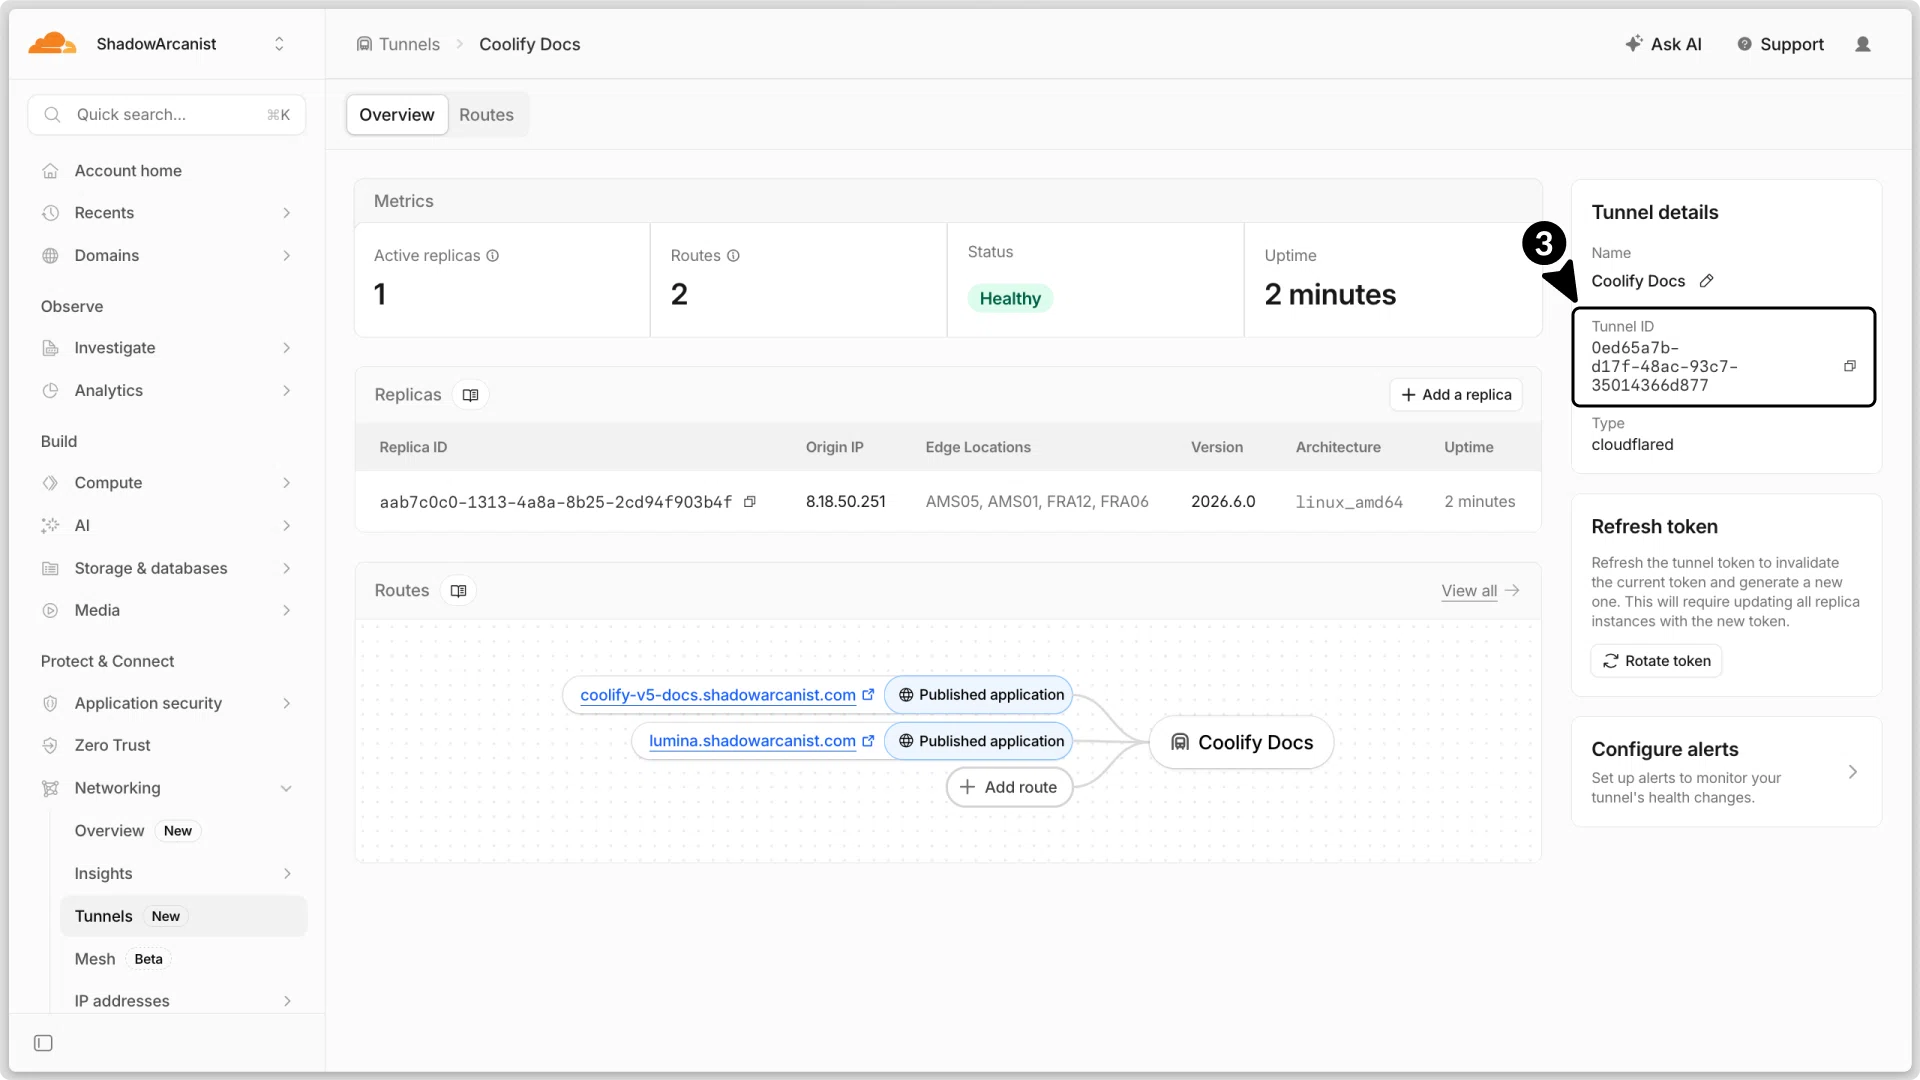
- Copy your tunnel ID from the Tunnels details section.
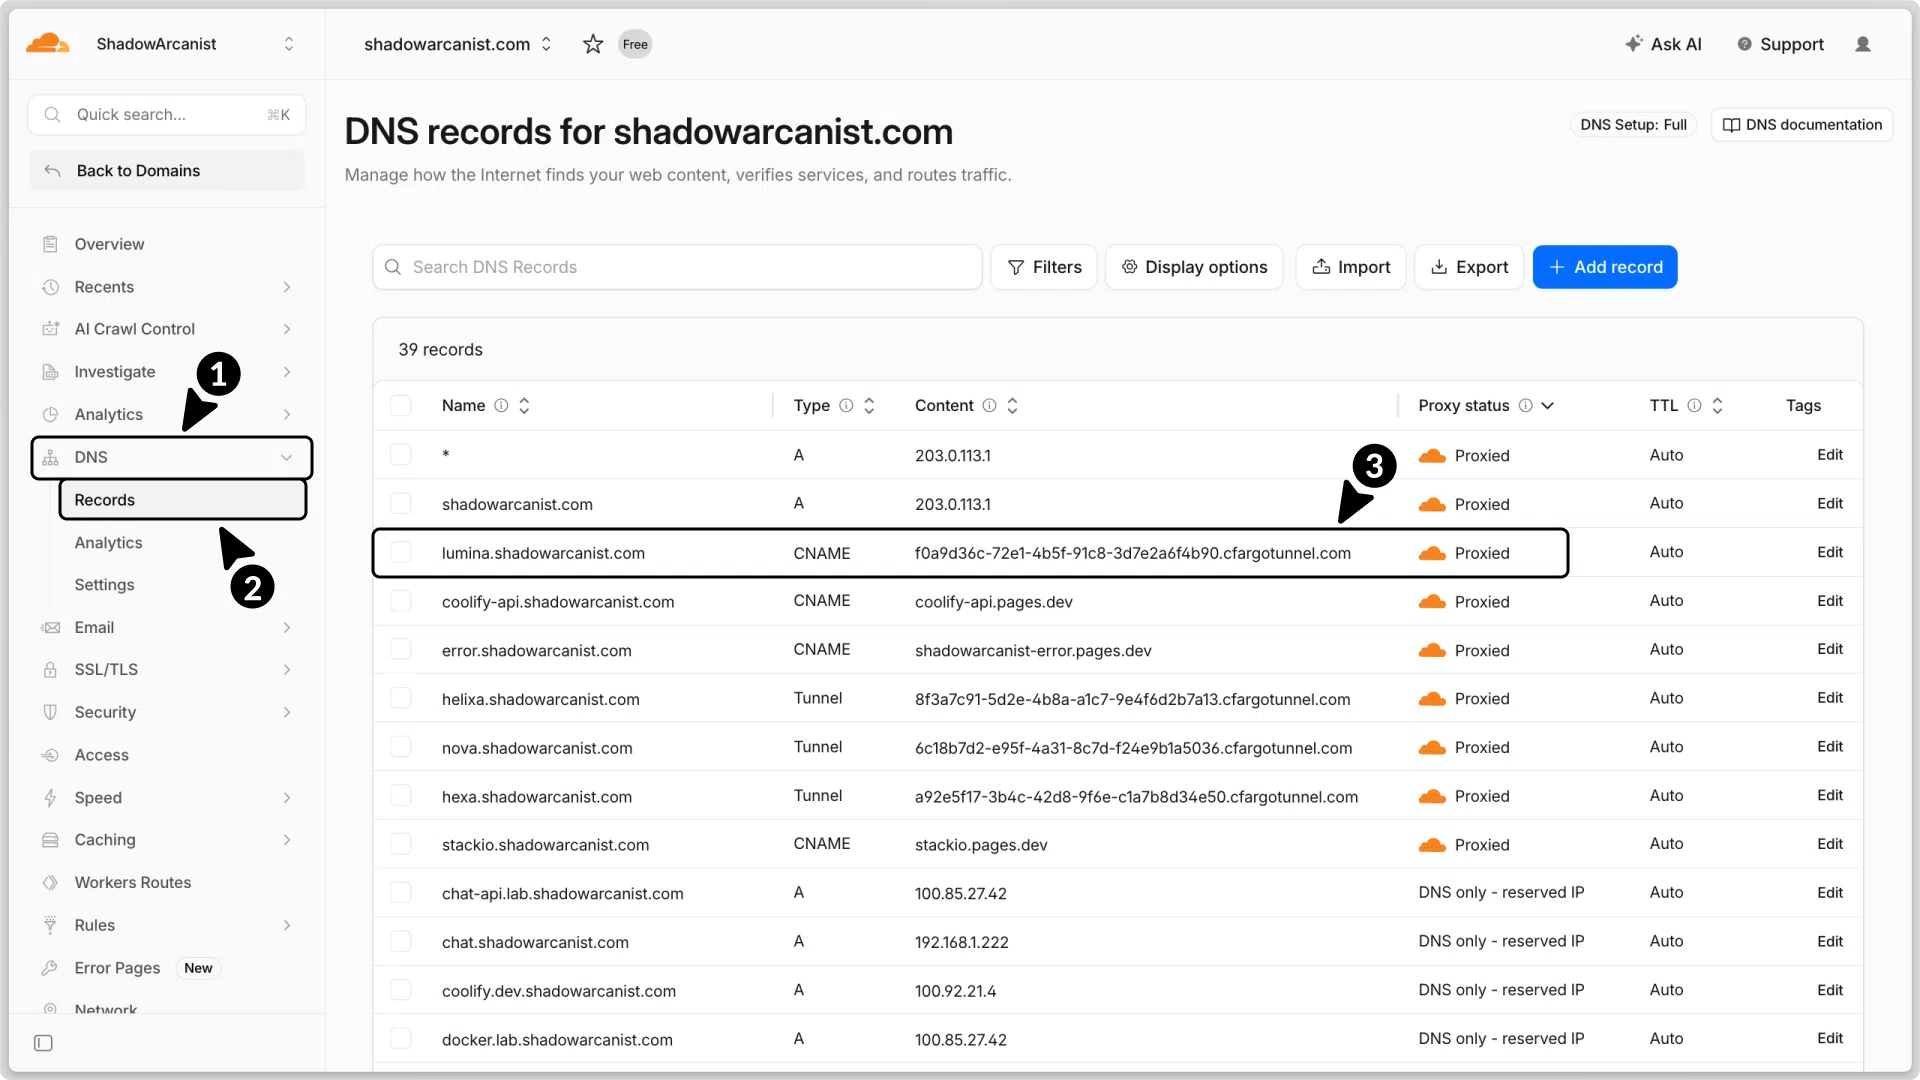
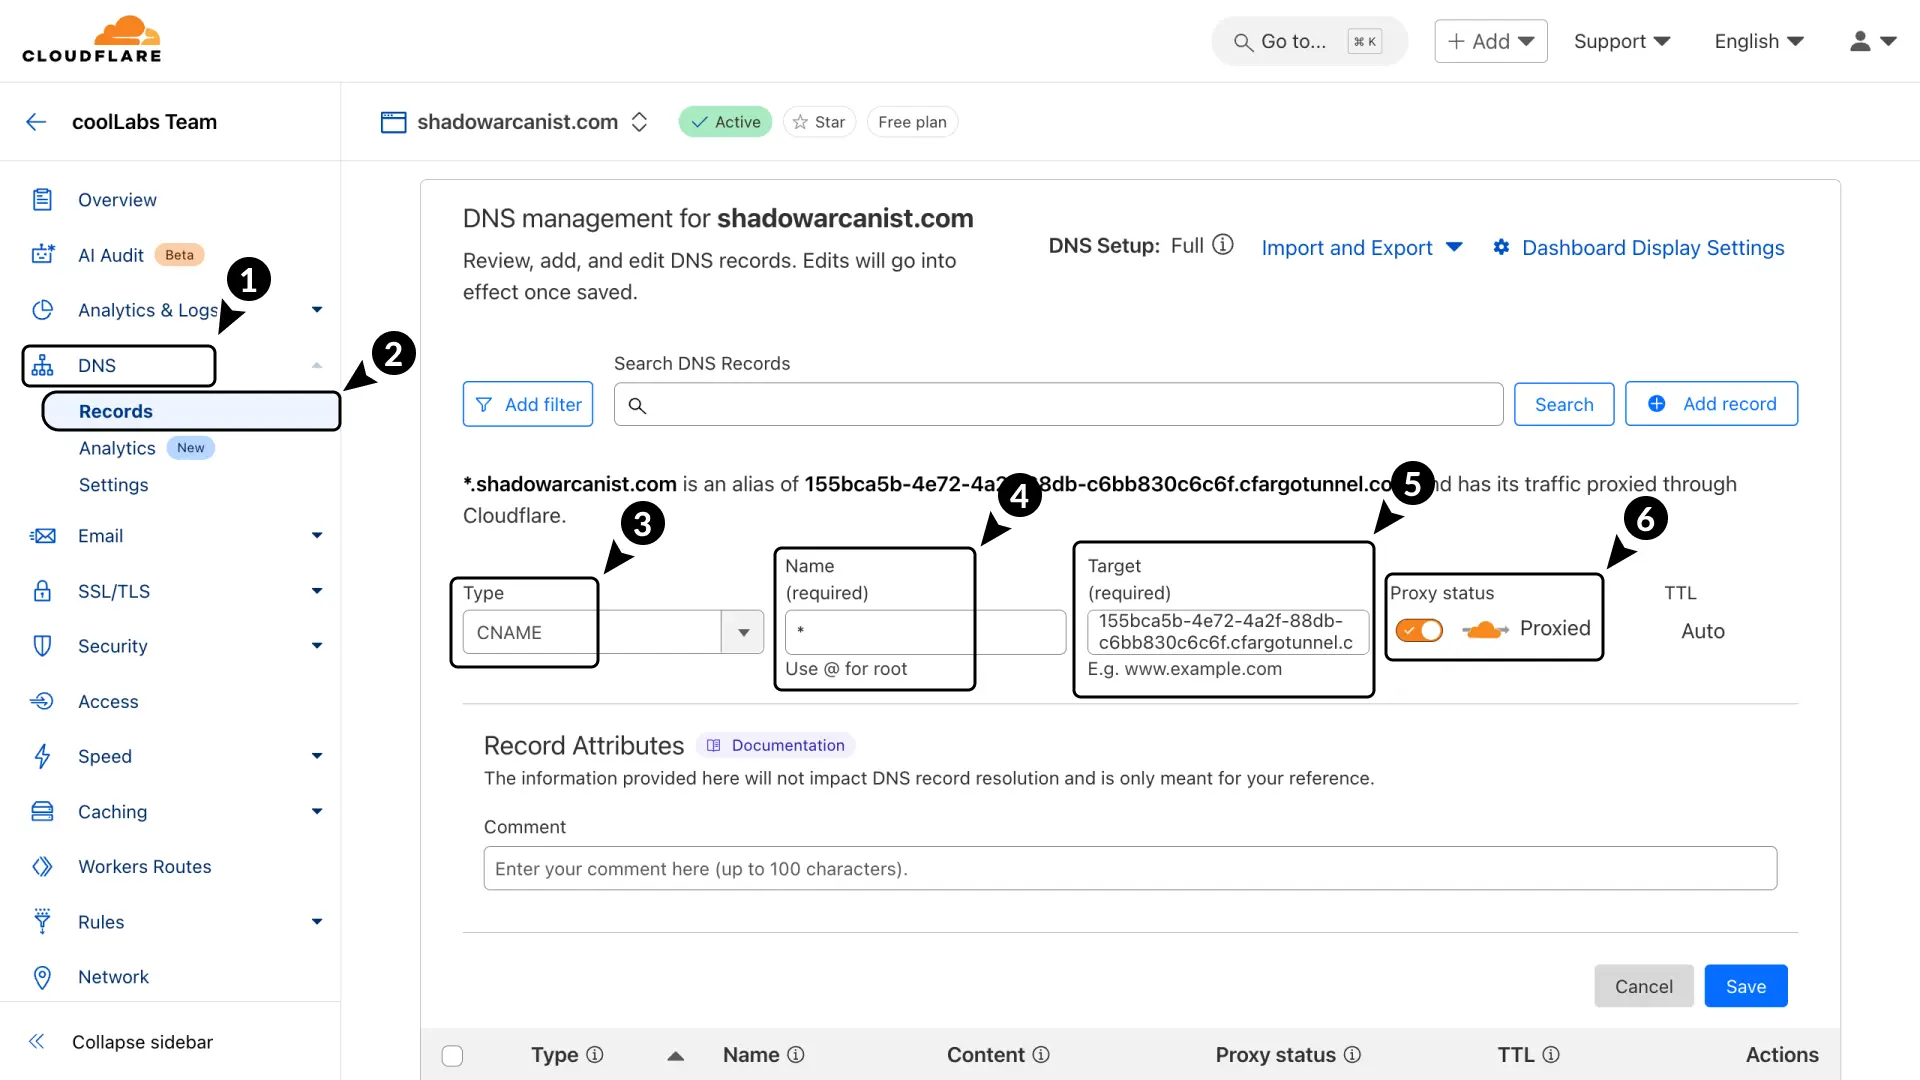
Create a new DNS record with the following details:
- In the Cloudflare dashboard, go to DNS.
- Select Records.
- Add a CNAME record.
- Enter the name as
*or the name of your subdomain (this should match the hostname you have for your app on the tunnel). - For the Target, enter the tunnel ID followed by
.cfargotunnel.com - Set the proxy status to Proxied.
Now, visit the domain of your application, and it should be accessible there.
Access All Resource via Cloudflare Tunnels
Expose all Coolify resources securely through Cloudflare Tunnels without public IPs or port forwarding using wildcard domains and HTTP proxy routing.
Server SSH Access via Cloudflare Tunnels
Enable secure SSH access to Coolify servers via Cloudflare Tunnels with automated or manual cloudflared installation hiding server IP addresses.